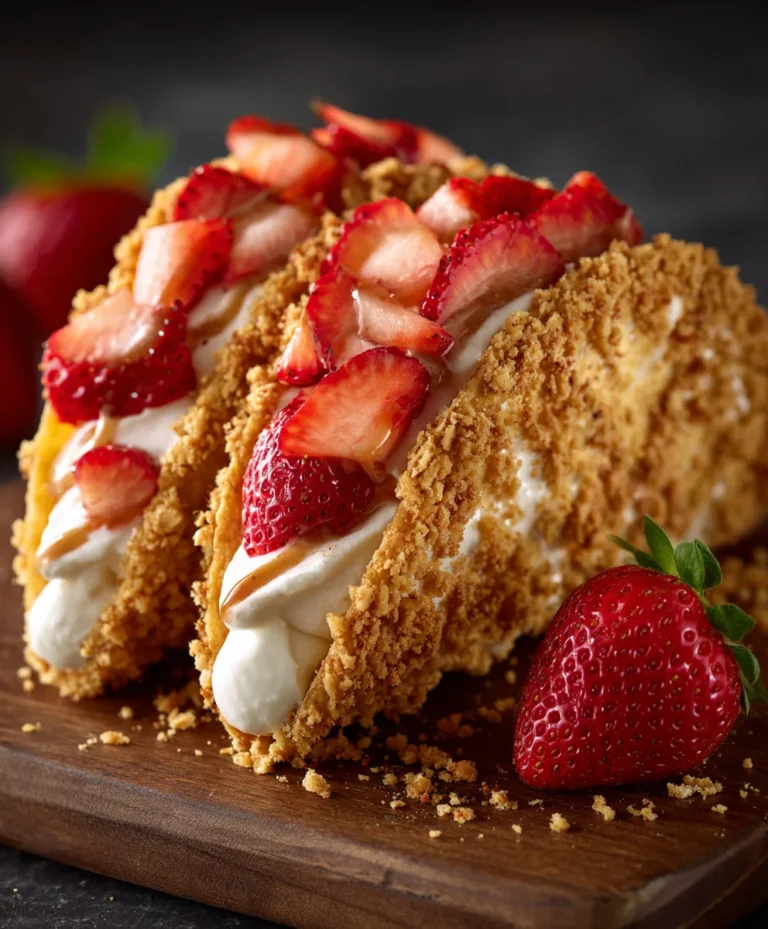
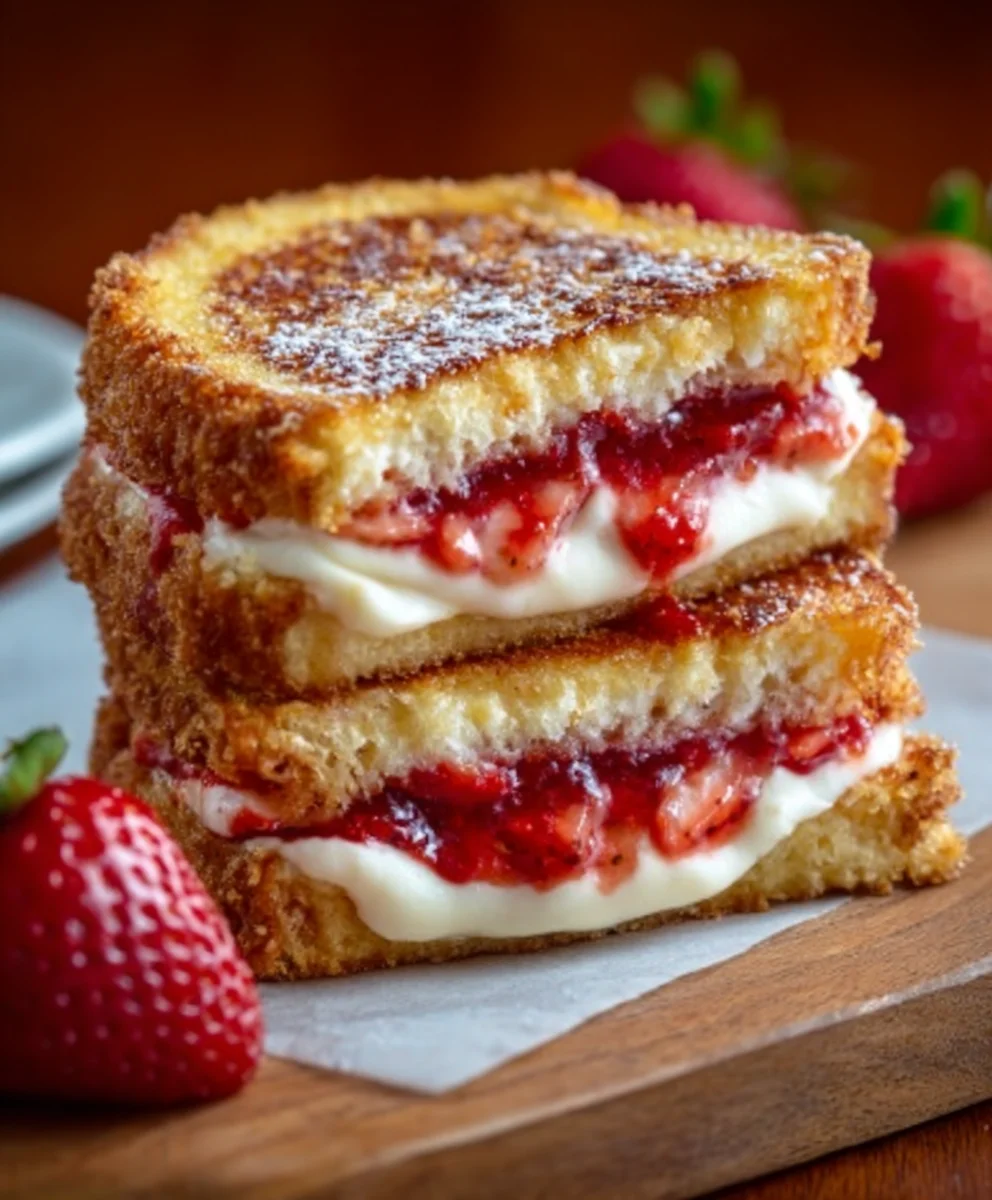
Fried Strawberry Cheesecake Sandwiches-Sweet Treat
Fried Strawberry Cheesecake Sandwiches are more than just a dessert; they’re a decadent escape into pure bliss. Imagin extracte the delightful crunch of a golden-brown, lightly fried outer shell giving way to a warm, creamy, and utterly luscious cheesecake filling, studded with sweet, vibrant strawberries. It’s this incredible textural contrast, combined with the familiar comfort of cheesecake elevated with a playful twist, that makes these handheld delights so irresistible. People are instantly drawn to them because they offer that perfect balance of sweet, tart, and creamy, all wrapped up in an unexpected, fun, and incredibly satisfying package. What truly sets these Fried Strawberry Cheesecake Sandwiches apart is the magical alchemy that happens when the cheesecake filling becomes slightly molten and gooey, creating an experience that’s both nostalgic and excitingly new. They’re the ultimate treat for impressing guests or simpgin extractindulging your own sweet tooth.
Ingredients:
- 8 slices of brioche or challah bread
- 4 oz cream cheese, softened
- 2 tbsp powdered sugar (plus more for dusting)
- 1/2 cup fresh strawberries, sliced
- 1/4 cup strawberry jam
- 2 large eggs
- 3 tbsp milk
- 2 tbsp butter (for frying)
Preparing the Filling and Assembly
Step 1: Crafting the Creamy Cheesecake Filling
The heart of our Fried Strawberry Cheesecake Sandwiches lies in a simple yet decadent cream cheese filling. Begin extract by ensuring your 4 oz of cream cheese is truly softened. This is crucial for achieving a smooth, lump-free consistency. You can achieve this by leaving it on the counter for about an hour, or for a quicker method, gently microwave it in 10-second bursts, stirring in between, until pliable but not melted. Once softened, transfer the cream cheese to a medium-sized bowl. Add the 2 tablespoons of powdered sugar to the bowl. The powdered sugar not only adds sweetness but also helps to create a lighter, creamier texture. Using a spatula or an electric mixer on low speed, whip the cream cheese and powdered sugar together until they are thoroughly combined and incredibly smooth. There should be no visible streaks of cream cheese or lumps of sugar. Taste a tiny bit (with a clean spoon, of course!) to ensure it’s sweet enough for your preference. If you desire a touch more sweetness, you can add another teaspoon of powdered sugar, but remember we also have jam and the natural sweetness of the strawberries.
Step 2: Layering the Sweetness
Now it’s time to prepare our bread slices for their transformation. Lay out all 8 slices of brioche or challah bread on a clean work surface. Brioche and challah are excellent choices here due to their slightly sweet and rich flavor, which complements the cheesecake filling beautifully. Spread a generous, even layer of the softened cream cheese mixture onto four of the bread slices. Make sure to go almost to the edges, but not so close that it will ooze out excessively during cooking. On top of the cream cheese layer on these four slices, artfully arrange your 1/2 cup of sliced fresh strawberries. Don’t overcrowd them, but ensure a good distribution so each bite gets a burst of fresh strawberry. Next, take your 1/4 cup of strawberry jam and, using a small spoon, dollop and spread small amounts of jam over the strawberries. The jam will melt slightly as it cooks, creating a wonderful strawberry sauce-like consistency within the sandwich. Finally, take the remaining four bread slices and gently place them on top of the jam-covered strawberries, creating four complete sandwiches. Press down lightly to help everything adhere.
Preparing for Frying
Step 3: Creating the Eggy Batter
For that irresistible golden-brown, crispy exterior, we need to give our sandwiches a delicious bath. In a shallow dish or pie plate, crack your 2 large eggs. Add the 3 tablespoons of milk to the eggs. The milk helps to thin out the egg mixture, creating a more even coating and preventing the bread from becoming too dense. Whisk the eggs and milk together vigorously until they are well combined and slightly frothy. The goal is a uniform yellow liquid. Make sure there are no streaks of egg white or yolk remaining. This batter will act as the glue and the flavor enhancer for the outside of our cheesecake sandwiches. It’s important to have this ready to go before you start heating the butter, as the assembled sandwiches will need to be dipped immediately.
The Frying Process
Step 4: Achieving Golden Perfection
This is where the magic happens and our sandwiches turn into golden delights. Place a large non-stick skillet or griddle over medium heat. Add the 2 tablespoons of butter to the skillet. Allow the butter to melgin extractnd begin to sizzle gently. You’re looking for a shimmering surface, not a browned or smoky one, as we don’t want to burn the butter, which would impart a bitter taste. Once the butter is melted and warm, carefully take one assembled sandwich and submerge it completely into the egg mixture, ensuring both sides are thoroughly coated. Let it soak for about 10-15 seconds on each side, allowing the bread to absorb some of the batter without becoming soggy.
Step 5: The Sizzle and Flip
Gently lift the coated sandwich from the egg wash, letting any excess batter drip back into the dish. Carefully place the sandwich into the heated butter in the skillet. Repeat this process with the remaining three sandwiches, ensuring not to overcrowd the pan. You might need to cook them in batches depending on the size of your skillet. Cook the sandwiches for approximately 2-3 minutes per side, or until they are beautifully golden brown and crisp. Resist the urge to move them too much initially; let them develop a nice crust before attempting to flip. Use a spatula to carefully flip each sandwich to the other side and cook for another 2-3 minutes until equally golden and cooked through. You should see the cream cheese starting to soften and become gooey from the heat. Monitor the heat closely; if they are browning too quickly, reduce the heat slightly. If they aren’t browning enough, increase it slightly.
Step 6: The Final Touch and Serving
Once all sides are golden and the filling is delightfully warm and melty, carefully remove the Fried Strawberry Cheesecake Sandwiches from the skillet and place them on a plate lined with paper towels to absorb any excess butter. While they are still warm, lightly dust the tops with a little extra powdered sugar for a beautiful finish. For an extra decadent treat, you can serve these immediately with a dollop of whipped cream or an extra drizzle of strawberry jam. The contrast between the warm, crispy exterior, the gooey cream cheese, the fresh burst of strawberries, and the sweet jam is truly heavenly. Enjoy these delightful treats while they are at their peak warmth and gooeyness!

Conclusion:
There you have it – the ultimate guide to crafting delightful Fried Strawberry Cheesecake Sandwiches! We’ve walked through each step, from preparing the creamy, dreamy cheesecake filling to achieving that perfect golden-brown, crispy exterior. These treats are more than just a dessert; they’re an experience, a celebration of sweet, tangy strawberries perfectly complemented by rich, decadent cheesecake, all encased in a delightful fried shell. Imagin extracte the joy on your friends’ and family’s faces as they bite into this unique creation. Serve them warm, dusted with a little powdered sugar or alongside a dollop of whipped cream for an extra touch of indulgence. Don’t be afraid to experiment with variations; perhaps a drizzle of chocolate sauce or a sprinkle of chopped nuts could add another layer of flavor. I truly encourage you to give these Fried Strawberry Cheesecake Sandwiches a try. They are surprisingly simple to make and incredibly rewarding. Happy cooking!
Frequently Asked Questions about Fried Strawberry Cheesecake Sandwiches:
Can I make the cheesecake filling ahead of time?
Absolutely! The cheesecake filling for your Fried Strawberry Cheesecake Sandwiches can be made up to two days in advance and stored in an airtight container in the refrigerator. This will save you time on the day you plan to assemble and fry them.
What is the best way to prevent the cheesecake filling from leaking out during frying?
Ensuring the edges of your bread are senon-alcoholic aled well is key to preventing leaks. You can lightly press the edges of the bread together with a fork after assembling the sandwich. Also, make sure the cheesecake filling isn’t overflowing before you seal it. Freezing the assembled sandwiches for about 15-20 minutes before frying can also help them hold their shape better and reduce the chances of leakage.
Fried Strawberry Cheesecake Sandwiches
A sweet and decadent treat featuring creamy cheesecake, fresh strawberries, and sweet jam sandwiched between slices of bread, then fried to a golden crisp.
Ingredients
-
8 slices of brioche or challah bread
-
4 oz cream cheese, softened
-
2 tbsp powdered sugar
-
1/2 cup fresh strawberries, sliced
-
1/4 cup strawberry jam
-
2 large eggs
-
3 tbsp milk
-
2 tbsp butter
Instructions
-
Step 1
Combine softened cream cheese and powdered sugar in a bowl until smooth and creamy. Taste and adjust sweetness if needed. -
Step 2
Spread cream cheese mixture onto four slices of bread. Top with sliced strawberries and then dollop strawberry jam over the strawberries. Place the remaining four bread slices on top to form sandwiches. -
Step 3
In a shallow dish, whisk together eggs and milk until well combined and slightly frothy. -
Step 4
Heat butter in a large non-stick skillet over medium heat until melted and shimmering. -
Step 5
Dip each sandwich into the egg mixture, coating both sides for about 10-15 seconds. Place coated sandwiches into the hot skillet. -
Step 6
Fry for 2-3 minutes per side, until golden brown and crisp. The filling should be warm and melty. -
Step 7
Remove from skillet, drain on paper towels, and dust with additional powdered sugar. Serve warm with optional whipped cream or extra jam.
Important Information
Nutrition Facts (Per Serving)
It is important to consider this information as approximate and not to use it as definitive health advice.
Allergy Information
Please check ingredients for potential allergens and consult a health professional if in doubt.