Easy Homemade Bread Recipe – Bake Delicious Loaves
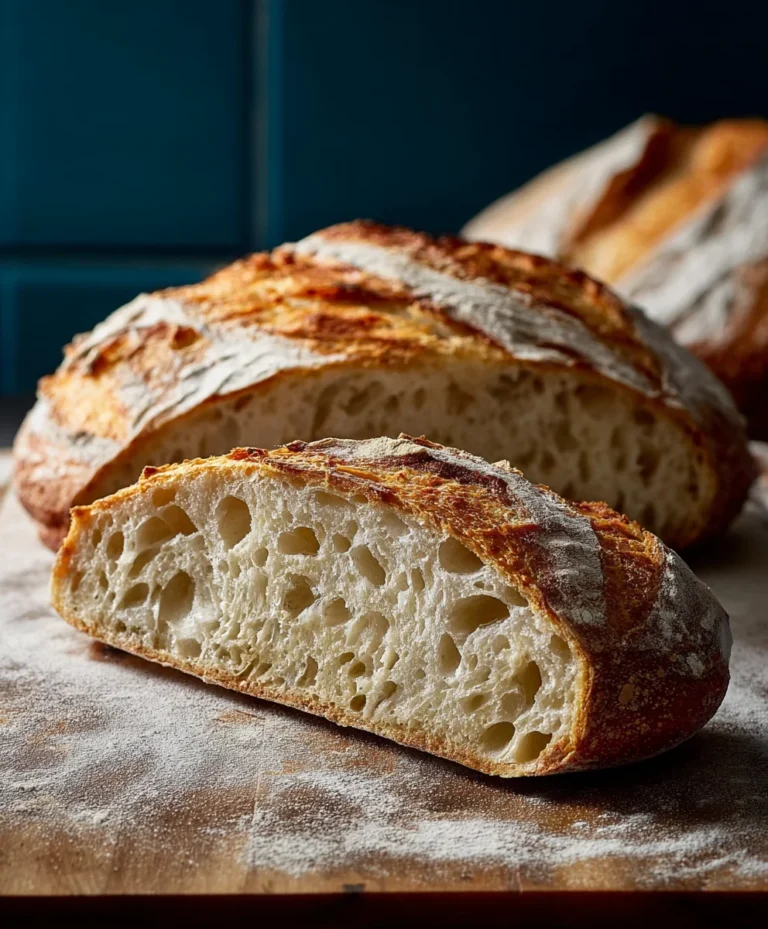
Easy Homemade Bread is more than just a recipe; it’s an invitation to unlock a simple joy that fills your kitchen with an irresistible aroma and your heart with a sense of accomplishment. There’s something profoundly satisfying about taking basic ingredients – flour, water, yeast, and salt – and transforming them into a warm, crusty loaf. We all love the comfort and nostalgia associated with fresh bread, whether it’s slathered with butter, dipped into soup, or forming the base of a delicious sandwich. What makes this particular easy homemade bread so special is its forgiving nature. You don’t need fancy equipment or years of baking experience to achieve stunning results. This recipe is designed for busy lives, proving that delicious, artisan-quality bread is within everyone’s reach. Get ready to discover the magic of baking your own loaf of easy homemade bread and experience the unparalleled taste of homemade perfection.
Easy Homemade Bread
There’s something incredibly satisfying about pulling a warm, crusty loaf of homemade bread from your own oven. The aroma alone is enough to fill your home with a comforting sense of accomplishment. Many people believe baking bread is a daunting task, reserved for seasoned bakers with specialized equipment. I’m here to tell you that couldn’t be further from the truth! This recipe for Easy Homemade Bread is designed for begin extractners, using simple ingredients and a straightforward process. You’ll be amazed at how effortlessly you can create a delicious, versatile loaf that’s perfect for toast, sandwiches, or simply slathering with butter. Forget the store-bought stuff; this is the real deal.
Ingredients:
Now that you have your simple ingredients gathered, let’s get started on the magic! The beauty of this recipe lies in its simplicity. We’re aiming for a rustic loaf with a lovely texture and a satisfying chew.
Getting Started: Mixing the Dough
1. Activate the Yeast (Optional but Recommended for Begin extractners): In a large mixing bowl, pour in your 1 ½ cups of warm water. The water should feel comfortably warm to the touch, like a baby’s bathwater – not hot, not cold. Too hot and you’ll kill the yeast; too cold and it won’t activate properly. Sprinkle your 1 packet (2 ¼ teaspoons) of instant yeast over the water. If you’re using instant yeast, you can technically skip this step and add it directly to the dry ingredients, but for those new to bread making, this step gives you a visual cue that your yeast is alive and well. Let it sit for about 5-10 minutes. You should see a foamy layer develop on top. This foam is the yeast waking up and doing its thing! If you don’t see foam, your yeast might be old, or your water temperature was off, and you should start again with fresh yeast and properly warmed water.
2. Combine Dry Ingredients and Form the Dough: Once your yeast is foamy, add your 3 cups of bread flour (or all-purpose flour, which will yield a slightly softer crum extractb) and 2 ½ teaspoons of kosher salt to the same bowl. Kosher salt has larger flakes than table salt and dissolves more easily, which is why it’s preferred here. If you only have table salt, reduce the amount slightly to about 2 teaspoons. Now, using a sturdy spoon or a spatula, start mixing everything together. Stir until the flour is mostly incorporated and a shaggy, sticky dough forms. Don’t worry about it being smooth at this stage; that’s what kneading is for. If the dough seems too dry, add a tablespoon of water at a time until it comes together. If it seems excessively wet and sticky, add a tablespoon of flour.
Kneading and Developing the Gluten
3. Knead the Dough: Turn the shaggy dough out onto a lightly floured surface. Now comes the fun part – kneading! This is crucial for developing the gluten in the flour, which gives bread its structure and chew. Push the dough away from you with the heels of your hands, then fold it back over itself. Rotate the dough a quarter turn and repeat. Continue this push, fold, and turn motion for about 8-10 minutes. You’re looking for the dough to become smooth, elastic, and less sticky. It should spring back slowly when you poke it with your finger. If the dough is sticking to your hands and the surface excessively, sprinkle a tiny bit more flour onto your hands and the work surface, but be careful not to add too much, as this can make the bread tough. This kneading process might seem tiring at first, but it’s incredibly therapeutic and essential for a good loaf.
First Rise: The Magic of Fermentation
4. First Rise (Proofing): Lightly grease a clean bowl with a little oil or cooking spray. Place your kneaded dough into the bowl and turn it to coat all sides. Cover the bowl tightly with plastic wrap or a damp kitchen towel. Find a warm, draft-free spot for the dough to rise. This could be on top of your refrigerator, in a slightly warmed (but turned off!) oven, or just in a sunny spot in your kitchen. Let the dough rise for about 1 to 1 ½ hours, or until it has doubled in size. This is where the yeast really goes to work, creating air pockets and developing flavor. You’ll know it’s ready when it looks noticeably puffier and feels light to the touch.
Shaping and Second Rise
5. Shape the Loaf and Second Rise: Gently punch down the risen dough to release some of the air. Turn it out onto your lightly floured surface again. At this point, you can shape it into your desired form. For a simple loaf, you can gently form it into an oval or round shape. If you have a loaf pan, grease it well and place the shaped dough inside. If you’re going for a rustic, free-form loaf, you can place it directly onto a baking sheet lined with parchment paper. Once shaped, cover the loaf again and let it rise for another 30-45 minutes, or until it’s puffed up again and looks almost ready to bake. It won’t double this time, but it should be significantly larger and airier.
Baking to Perfection
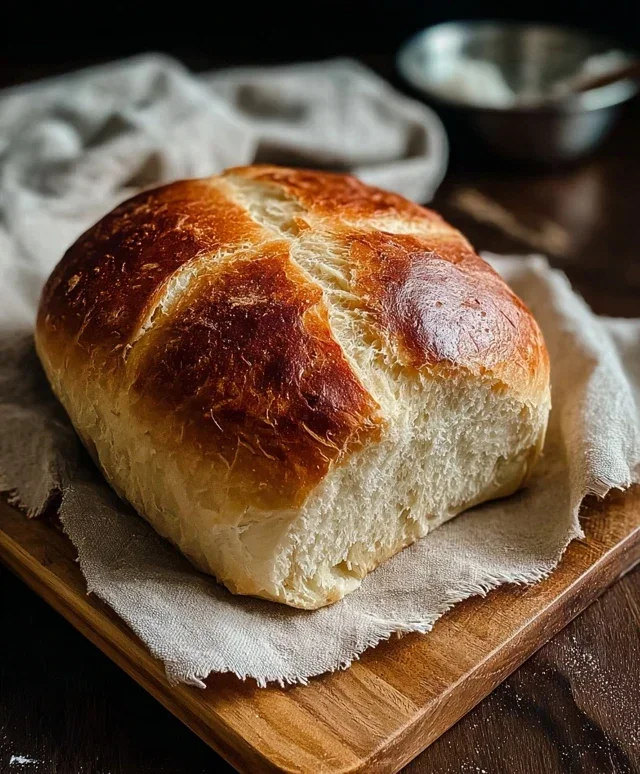
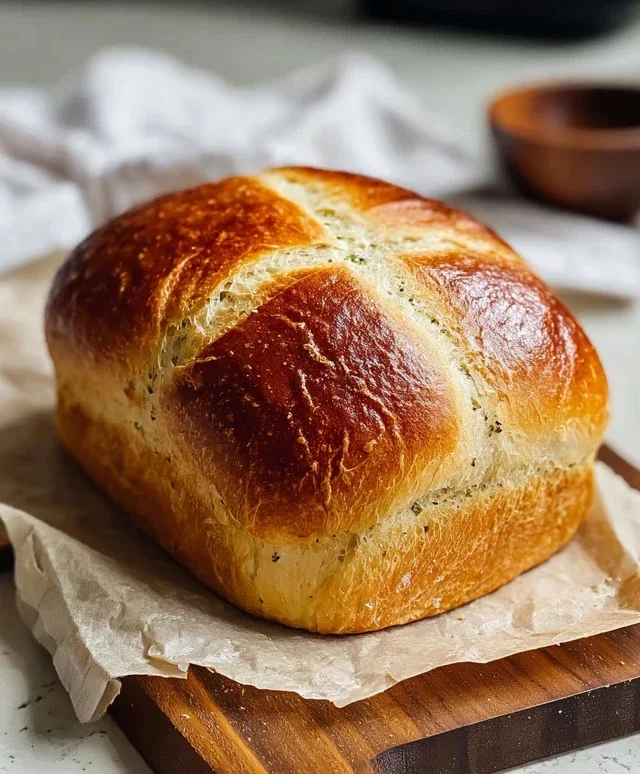
Preheat your oven to 400°F (200°C) during the second rise. Once the dough has completed its second rise, it’s time for the oven! For an extra-crusty exterior, you can create steam in your oven by placing a shallow pan of hot water on the bottom rack while the oven preheats. Carefully transfer your loaf to the preheated oven. Bake for 30-35 minutes, or until the crust is a deep golden brown and the internal temperature of the bread reaches 200-210°F (93-99°C) when checked with an instant-read thermometer. If you don’t have a thermometer, you can tap the bottom of the loaf – it should sound hollow.
Once baked, carefully remove the bread from the oven and transfer it to a wire rack to cool completely. Resist the urge to slice into it immediately! Allowing it to cool fully is crucial for the texture to set properly. Enjoy your delicious, homemade bread!
Conclusion:
There you have it! My incredibly straightforward and rewarding recipe for easy homemade bread. This recipe is a game-changer because it demystifies bread making, proving that delicious, crusty loaves are well within your reach, even if you’re a complete begin extractner. The beauty lies in its simplicity – minimal ingredients, straightforward steps, and a wonderfully forgiving dough. The aroma that fills your kitchen as it bakes is simply unparalleled, and the taste of fresh, warm bread is an experience worth savoring.
This versatile loaf is perfect for so many occasions! Enjoy it toasted with butter for breakfast, as a base for your favorite sandwiches, or alongside a hearty soup or salad for dinner. Don’t be afraid to get creative with variations! Consider adding a sprinkle of herbs like rosemary or thyme to the dough for an herby twist, or incorporate a handful of cheese for a savory delight. A touch of honey or molasses can add a delightful sweetness. I truly encourage you to give this easy homemade bread a try. You’ll be amazed at what you can create with your own two hands!
Frequently Asked Questions:
Why is my bread dough not rising?
This can happen for a few reasons. Ensure your yeast is fresh and activated correctly. Lukewarm liquid (around 105-115°F or 40-46°C) is crucial for yeast activity; too hot will kill it, and too cold won’t wake it up. Also, make sure your rising environment is warm enough. A slightly warmer spot, like a turned-off oven with the light on, can help.
Can I make this bread ahead of time?
Absolutely! Once cooled completely, you can store your easy homemade bread in an airtight bag or container at room temperature for 2-3 days. For longer storage, it freezes beautifully. Slice it first, then wrap tightly in plastic wrap and then foil, or place in a freezer bag. It can be frozen for up to 3 months and simply thawed at room temperature or toasted from frozen.
Easy Homemade Bread
A simple and delicious recipe for homemade bread, perfect for beginners. Uses basic pantry staples for a satisfying crusty loaf.
Ingredients
-
1 ½ cups warm water
-
3 cups bread flour
-
1 packet Instant Yeast
-
2 ½ tsp kosher salt
-
1 tablespoon olive oil
-
1 teaspoon sugar
Instructions
-
Step 1
In a large bowl, whisk together the warm water and sugar. Sprinkle the instant yeast over the water and let it sit for 5-10 minutes until foamy. -
Step 2
Add the bread flour, kosher salt, and olive oil to the bowl with the yeast mixture. -
Step 3
Stir with a wooden spoon or spatula until a shaggy dough forms and most of the flour is incorporated. It will be sticky. -
Step 4
Cover the bowl with plastic wrap or a damp kitchen towel and let it rise in a warm place for 30-60 minutes, or until doubled in size. -
Step 5
Preheat your oven to 450°F (230°C). Place a Dutch oven or oven-safe pot with a lid into the oven while it preheats. -
Step 6
Gently scrape the dough out onto a lightly floured surface. Shape it loosely into a round or oval. Do not knead. -
Step 7
Carefully remove the hot Dutch oven from the oven. Gently place the dough into the hot Dutch oven. Place the lid on top. -
Step 8
Bake covered for 30 minutes. Remove the lid and bake for an additional 5-10 minutes, or until the crust is golden brown. -
Step 9
Let the bread cool on a wire rack for at least 20 minutes before slicing.
Important Information
Nutrition Facts (Per Serving)
It is important to consider this information as approximate and not to use it as definitive health advice.
Allergy Information
Please check ingredients for potential allergens and consult a health professional if in doubt.