Crispy Country Fried Chicken Recipe-Best Ever
Country fried chicken isn’t just a meal; it’s a hug on a plate. When I think of comfort food, this is the dish that instantly comes to mind. There’s something universally adored about those golden-brown, impossibly crispy pieces of chicken, each bite yielding to a juicy, tender interior. It’s the kind of dish that sparks memories of family gatherings, Sunday dinners, and the simple joy of sharing good food. What makes country fried chicken so special? It’s a symphony of textures and flavors: the satisfying crunch of the seasoned flour coating, the savory depth of perfectly cooked chicken, and often, a creamy, dreamy gravy that ties it all together. It’s a testament to time-honored cooking techniques and the power of simple, quality ingredients transformed into something truly magical. Get ready to create your own unforgettable batch of country fried chicken!
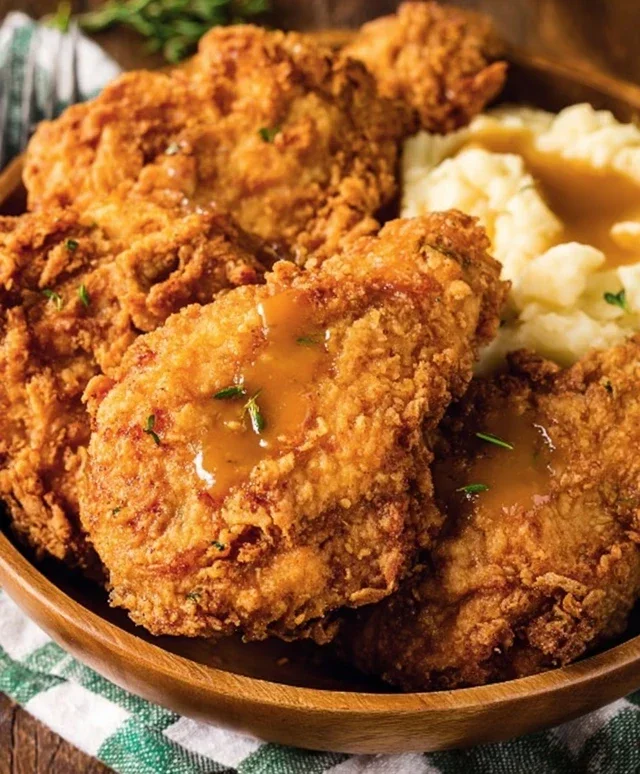
Country Fried Chicken
There’s something undeniably comforting about a plate of golden-brown, crispy country fried chicken. It’s a dish that evokes memories of family dinners, Sunday lunches, and the pure joy of simple, well-executed food. This recipe aims to capture that classic flavor and texture, delivering a chicken that’s incredibly tender on the inside and satisfyingly crunchy on the outside. We’ll guide you through each step, from preparing the chicken to achieving that perfect fried finish. Get ready to fill your kitchen with an aroma that’s sure to get everyone excited!
Ingredients:
Getting Started: Preparing the Chicken
The foundation of any great fried chicken dish is the quality and preparation of the chicken itself. For this recipe, we’re using boneless, skinless chicken breasts. To ensure even cooking and tenderness, I like to cut each chicken breast in half horizontally, creating thinner cutlets. This not only speeds up the cooking time but also makes it easier to achieve that perfect crispy coating without overcooking the interior. Once cut, place the chicken pieces in a shallow dish or a large resealable plastic bag.
The Buttermilk Bath
This is a crucial step for achieving incredibly tender and flavorful chicken. Pour the 2 cups of buttermilk over the chicken pieces, ensuring they are fully submerged. The acidity in the buttermilk helps to break down the chicken’s proteins, making it exceptionally tender. It also provides a sticky surface for the flour coating to adhere to. Now, sprinkle the 3 teaspoons of salt evenly over the chicken and buttermilk mixture. This initial salting seasons the chicken from the inside out. Cover the dish or seal the bag and refrigerate for at least 2 hours, or ideally, overnight. The longer it marinates, the more tender and flavorful your chicken will become. If you find yourself short on buttermilk, you can create a substitute by mixing 2 cups of regular milk with 2 tablespoons of lemon juice or white vinegar. Let it sit for 5-10 minutes until it thickens slightly before using.
Creating the Crispy Coating
While the chicken is happily marinating, it’s time to prepare our dredgin extractg station. In a shallow dish or a pie plate, combine the 1 ½ cups of all-purpose flour, ½ cup of breadcrum extractbs, 2 ½ teaspoons of seasoned salt, ¾ teaspoon of paprika, ½ teaspoon of cayenne pepper, and 1 ½ teaspoon of black pepper. Whisk these dry ingredients together thoroughly. The breadcrum extractbs will contribute to the overall crispiness, while the seasoned salt, paprika, and cayenne pepper will add depth of flavor and a hint of warm spice.
In a separate shallow dish, whisk together the 2 large eggs. This egg wash will act as a binder, helping the flour mixture to cling to the chicken.
The Frying Process
Now for the part that brings it all to life: frying! Heat the 1 ½ cups of vegetable oil in a large, heavy-bottomed skillet (cast iron is excellent for this) over medium-high heat. You’re looking for the oil to reach approximately 350°F (175°C). A good way to test if the oil is ready without a thermometer is to drop a tiny pinch of flour into it; it should sizzle immediately and rapidly.
Working in batches to avoid overcrowding the pan, which can lower the oil temperature and result in soggy chicken, remove one piece of chicken from the buttermilk marinade, letting any excess drip off. Dredge the chicken piece thoroughly in the flour mixture, pressing gently to ensure it’s well coated on all sides. Then, dip the flour-coated chicken into the whisked eggs, letting any excess drip off. Finally, dredge it back into the flour mixture one last time, ensuring a thick, even coating. This double-dredgin extractg process is key to achieving that extra crispy exterior.
Carefully place the coated chicken pieces into the hot oil, making sure not to overcrowd the skillet. You should hear a satisfying sizzle as the chicken hits the oil. Fry for about 4-6 minutes per side, depending on the thickness of your chicken pieces, until they are golden brown and cooked through. The internal temperature should reach 165°F (74°C). As each batch is done, remove the chicken from the skillet and place it on a wire rack set over a baking sheet. This allows the excess oil to drain off, maintaining the crispiness.
Finishing Touches and Serving
Once all the chicken has been fried to golden perfection, let it rest for a few minutes before serving. This allows the juices to redistribute, resulting in a more succulent chicken. Country fried chicken is a versatile dish and pairs beautifully with a variety of sides. Classic accompaniments include creamy mashed potatoes, buttered biscuits, a fresh green salad, or your favorite vegetable. The aroma alone will have everyone gathering around the table, eager to dig in. Enjoy your homemade, wonderfully crispy country fried chicken!

Conclusion:
And there you have it! This country fried chicken recipe is a true taste of comfort and tradition. Its beauty lies in its simplicity, delivering that perfect crispy exterior and incredibly juicy interior that we all crave. The seasoned flour dredge ensures every bite is bursting with flavor, and the careful frying technique guarantees a golden-brown masterpiece. It’s a dish that brings people together and makes any meal feel special. I truly encourage you to give this a try – I promise you won’t be disappointed!
This wonderfully versatile dish is fantastic served with classic sides like creamy mashed potatoes, collard greens, or a fresh corn on the cob. For a heartier meal, consider a side of biscuits and gravy. If you’re looking to switch things up, consider experimenting with different spice blends in your flour mixture. A pinch of smoked paprika or a dash of cayenne pepper can add a delightful new dimension to your country fried chicken. Don’t be afraid to make it your own!
Frequently Asked Questions:
How do I ensure my country fried chicken is super crispy?
Achieving that perfect crispiness is all about the dredgin extractg process and the oil temperature. Make sure your chicken pieces are thoroughly coated in the seasoned flour, and let them rest for about 10-15 minutes after dredgin extractg. This allows the flour to adhere better. Also, maintain a consistent oil temperature between 325-350°F (160-175°C). If the oil is too cool, the chicken will absorb too much grease; too hot, and it will burn before cooking through.
Can I make this recipe ahead of time?
While country fried chicken is best enjoyed fresh, you can do some prep work in advance. You can dredge the chicken a few hours ahead and keep it refrigerated on a wire rack set over a baking sheet. However, for the ultimate crispiness and juiciness, I strongly recommend frying it just before serving. Reheating fried chicken can sometimes result in a less desirable texture.
What kind of oil is best for frying?
A neutral oil with a high smoke point is ideal for this recipe. Vegetable oil, canola oil, or peanut oil are excellent choices. They won’t impart any unwanted flavors and can withstand the high temperatures needed for successful frying.
Country Fried Chicken
Crispy and flavorful country fried chicken, a classic Southern comfort food.
Ingredients
-
4 boneless skinless chicken breasts
-
2 cups buttermilk
-
2 large eggs (whisked)
-
1 ½ cup all-purpose flour
-
½ cup breadcrumbs
-
2 ½ teaspoons seasoned salt
-
¾ teaspoon paprika
-
½ teaspoon cayenne pepper
-
1 ½ teaspoon black pepper
-
3 teaspoons salt
-
1 ½ cups vegetable oil
Instructions
-
Step 1
Cut chicken breasts into 2-3 pieces each. -
Step 2
In a bowl, whisk together buttermilk and eggs. Add chicken pieces, cover, and marinate in the refrigerator for at least 30 minutes or up to 4 hours. -
Step 3
In a shallow dish, combine flour, breadcrumbs, seasoned salt, paprika, cayenne pepper, black pepper, and 3 teaspoons of salt. Mix well. -
Step 4
Remove chicken from buttermilk mixture, letting excess drip off. Dredge each piece thoroughly in the flour mixture, pressing to coat evenly. -
Step 5
Heat vegetable oil in a large skillet over medium-high heat to 350°F (175°C). Carefully place chicken pieces in the hot oil, ensuring not to overcrowd the pan. You may need to fry in batches. -
Step 6
Fry chicken for approximately 5-7 minutes per side, or until golden brown and cooked through. Internal temperature should reach 165°F (74°C). -
Step 7
Remove fried chicken from the skillet and place on a wire rack set over a baking sheet to drain excess oil.
Important Information
Nutrition Facts (Per Serving)
It is important to consider this information as approximate and not to use it as definitive health advice.
Allergy Information
Please check ingredients for potential allergens and consult a health professional if in doubt.