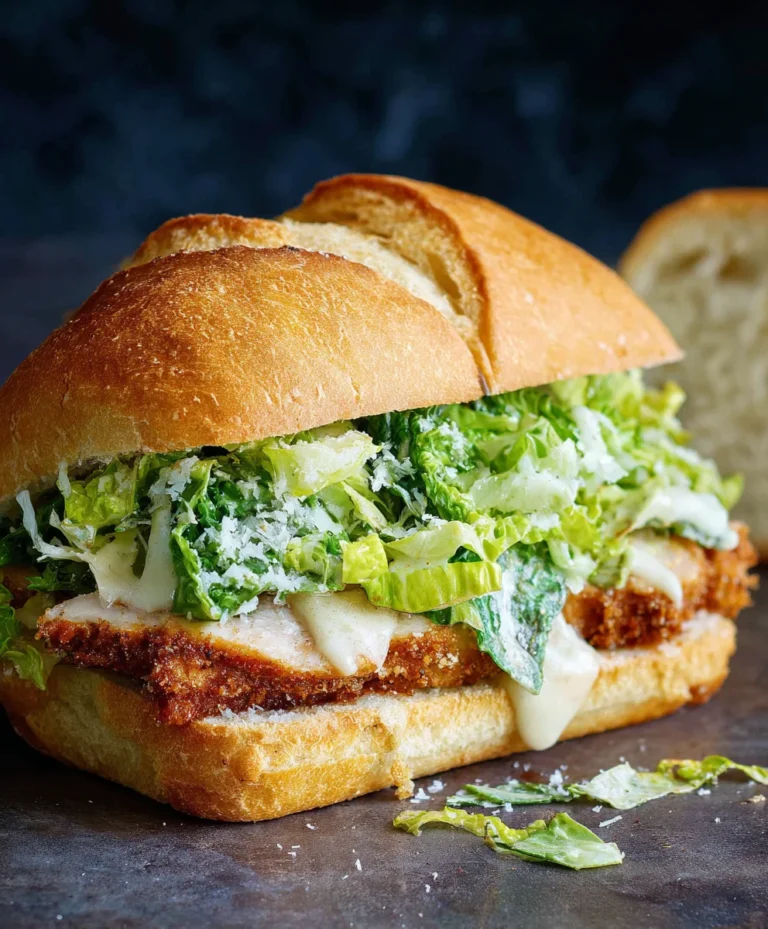
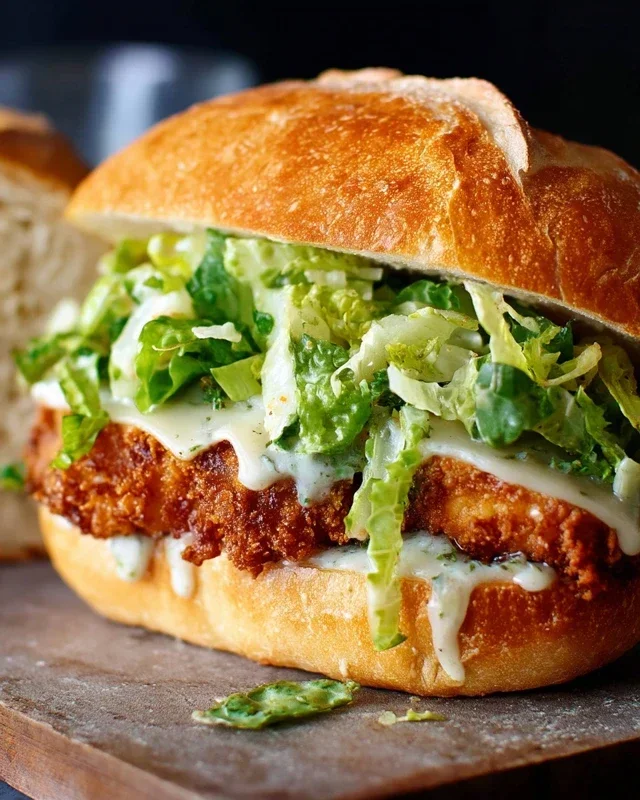
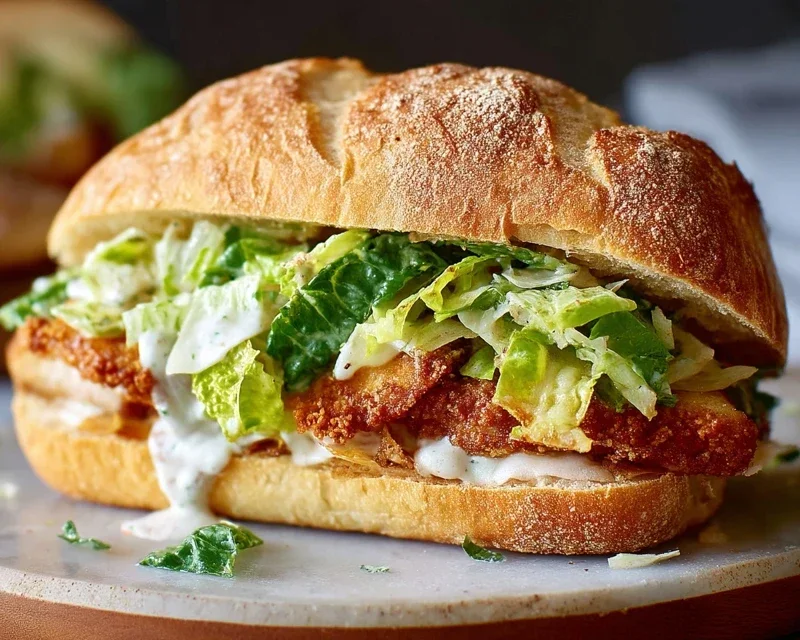
Crispy Chicken Caesar Sandwich- The Best Ever
Crispy Chicken Caesar Sandwich. Let’s be honest, sometimes only a classic will do, and this iconic sandwich takes a beloved flavor combination and elevates it to an entirely new level of deliciousness. We’re talking about the undeniable allure of a perfectly fried, golden-brown chicken breast, nestled within a soft bun and generously slathered with that creamy, tangy Caesar dressing we all adore. What is it about the Crispy Chicken Caesar Sandwich that makes it such a crowd-pleaser? It’s the symphony of textures and tastes: the satisfying crunch of the chicken, the tender embrace of the bread, the crisp freshness of romaine, and that signature umami punch from the dressing and Parmesan. It’s comforting, it’s indulgent, and it’s surprisingly easy to create a truly memorable Crispy Chicken Caesar Sandwich right in your own kitchen.
Get ready to experience your new favorite lunch (or dinner!).
Crispy Chicken Caesar Sandwich
There’s something undeniably comforting and satisfying about a perfectly executed sandwich. And when you combine the classic, crowd-pleasing flavors of a Caesar salad with the irresistible crunch of fried chicken, you’ve got a recipe for pure sandwich bliss. This Crispy Chicken Caesar Sandwich takes everything you love about a Caesar salad – the creamy, tangy dressing, the salty Parmesan, the hint of garlic – and elevates it with golden-brown, juicy chicken nestled between soft buns. It’s a meal that’s both sophisticated enough for a weekend lunch and easy enough for a weeknight craving. Forget soggy lettuce and bland chicken; this is an experience that will have you rethinking what a sandwich can be.
The secret to this sandwich lies in a few key elements. First, the chicken. We’re aiming for that perfect balance of crispy exterior and tender, flavorful interior. The coating is crucial here, and we’ve got a simple yet effective method to achieve that coveted crunch. Second, the Caesar dressing. We’re not just slathering on store-bought stuff. This homemade dressing is a game-changer, rich, creamy, and bursting with those iconic Caesar flavors, with a little help from tangy Greek yogurt for a lighter touch. Finally, the assembly. It’s not just about piling ingredients on a bun; it’s about layering flavors and textures for a harmonious bite.
Let’s get started on crafting this culinary masterpiece. Prepare to impress yourself and anyone lucky enough to share this with you.
Ingredients:
Preparing the Caesar Dressing
This is where the magic begin extracts, folks. We’re making a quick and incredibly delicious Caesar dressing that will tie all the flavors together.
1. In a medium bowl, combine the full-fat mayonnaise and Greek yogurt. The mayonnaise provides that classic rich creaminess, while the Greek yogurt adds a pleasant tangin extractess and a slightly lighter feel. Whisk these together until they are smoothly incorporated.
2. Next, add the Dijon mustard. This will give our dressing a subtle sharpness and depth. Then, stir in the Worcestershire sauce. This is a secret weapon for adding umami and complexity.
3. Squeeze in the fresh lemon juice. This brightens everything up and cuts through the richness of the mayonnaise. Now, it’s time for the star: the freshly grated Parmesan cheese. Don’t skimp on the fresh stuff; it makes a world of difference in flavor and texture.
4. Add the minced garlic. If you’re a garlic lover, feel free to add an extra clove, but remember that raw garlic can be quite potent. A pinch of sea salt and ¼ teaspoon of black pepper will season the dressing perfectly. Whisk everything together until it’s beautifully emulsified and creamy. Taste and adjust seasoning if needed – you might want a little more lemon or salt depending on your preference. Set this aside; it will only get better as the flavors meld.
Crisping Up the Chicken
The heart of our sandwich is, of course, the chicken. We want it juicy on the inside and satisfyingly crunchy on the outside.
1. Take your chicken cutlets and pat them thoroughly dry with paper towels. This is a crucial step for achieving a crispy coating, as excess moisture will prevent the flour from adhering properly and will steam the chicken instead of frying it. Season both sides of the chicken cutlets generously with sea salt and ground black pepper to taste. Don’t be shy; this is the main seasoning for the chicken itself.
2. In a shallow dish or a plate, combine the all-purpose flour with ½ teaspoon of salt. Give it a good mix. This flour mixture will be our coating. You’ll want to ensure the chicken is evenly coated in this flour mixture.
3. Heat a generous amount of oil in a large skillet over medium-high heat. You want enough oil to come about ½ inch up the sides of the pan. You can test if the oil is hot enough by dropping a tiny pinch of flour into it; it should sizzle immediately.
4. Carefully place the seasoned and floured chicken cutlets into the hot oil, being careful not to overcrowd the pan. You might need to fry them in batches. Overcrowding will lower the oil temperature, leading to greasy, soggy chicken.
5. Fry the chicken for about 4-6 minutes per side, or until it’s golden brown and cooked through. The exact time will depend on the thickness of your cutlets. You’re looking for an internal temperature of 165°F (74°C) for safety. Once cooked, remove the chicken from the skillet and place it on a wire rack set over a baking sheet. This allows any excess oil to drain off, keeping your chicken extra crispy.
Assembling Your Masterpiece
Now for the grand finnon-alcoholic ale: putting it all together!
1. Lightly toast your sandwich buns. This adds another layer of texture and prevents the buns from getting soggy.
2. Generously spread a layer of your homemade Caesar dressing on the bottom half of each bun.
3. Place one or two crispy chicken cutlets on top of the dressing.
4. If you like, add a few fresh romaine lettuce leaves for that classic Caesar crunch and freshness.
5. Drizzle a little more Caesar dressing over the lettuce and chicken.
6. Top with the other half of the bun.
Serve immediately and prepare for applause! This Crispy Chicken Caesar Sandwich is a triumph of flavor and texture, a guaranteed hit for any meal. Enjoy every delicious bite!
Conclusion:
And there you have it – the ultimate guide to creating a truly spectacular Crispy Chicken Caesar Sandwich! This recipe delivers that perfect crunch, a burst of tangy Caesar flavor, and the satisfying heartiness that makes a sandwich a meal. It’s incredibly versatile, allowing you to customize it to your heart’s content. Whether you’re looking for a quick and delicious lunch, a hearty dinner, or something to impress your friends at a picnic, this sandwich is a winner. Don’t be intimidated by making it from scratch; the steps are straightforward and the rewards are immense. I truly encourage you to give this Crispy Chicken Caesar Sandwich a try – I promise you won’t be disappointed!
For serving, this sandwich is fantastic on its own, but it also pairs beautifully with a side of seasoned fries, a crisp green salad, or even some sweet potato wedges. Think about adding a layer of thinly sliced red onion or some crunchy pickles for extra texture and zing. If you’re feeling adventurous, consider a sprinkle of crispy fried capers on top of the chicken for an extra pop of flavor.
Frequently Asked Questions:
Can I make the chicken ahead of time?
Absolutely! You can bread and cook the chicken pieces a day in advance. Store them in an airtight container in the refrigerator. When you’re ready to assemble your sandwich, simply reheat the chicken in a toaster oven or air fryer for a few minutes to restore its crispiness.
What if I don’t have romaine lettuce?
While romaine is classic for its crunch, you can certainly substitute it. Crisp iceberg lettuce or even some peppery arugula would work wonderfully. The key is to have something with a bit of bite and freshness to balance the richness of the chicken and dressing.
How can I make this sandwich even healthier?
For a lighter version, consider using grilled chicken instead of fried, or air-frying your breaded chicken. You could also opt for a whole wheat bun and add extra vegetables like spinach or sliced bell peppers. Using a lighter Caesar dressing or a yogurt-based dressing are other great options.
Crispy Chicken Caesar Sandwich
A delicious and satisfying sandwich featuring crispy fried chicken coated in a creamy homemade Caesar dressing, perfect for a quick lunch or dinner.
Ingredients
-
½ cup full-fat mayonnaise
-
3 tbsp Greek yogurt
-
1 tsp Dijon mustard
-
1 tsp Worcestershire sauce
-
2 tbsp lemon juice
-
¼ cup Parmesan cheese (freshly grated)
-
1-2 garlic cloves (minced)
-
¼ tsp black pepper
-
Pinch sea salt
-
5 chicken cutlets
-
sea salt (to taste)
-
ground black pepper (to taste)
-
Oil (for frying)
-
⅓ cup all-purpose flour
-
½ tsp salt
Instructions
-
Step 1
Prepare the Caesar dressing: In a medium bowl, whisk together the mayonnaise, Greek yogurt, Dijon mustard, Worcestershire sauce, lemon juice, grated Parmesan cheese, minced garlic, ¼ tsp black pepper, and pinch sea salt until well combined. -
Step 2
Season the chicken: Pat the chicken cutlets dry with paper towels. Season both sides generously with sea salt and ground black pepper. -
Step 3
Coat the chicken: In a shallow dish, combine the all-purpose flour and ½ tsp salt. Dredge each chicken cutlet in the flour mixture, ensuring it is evenly coated. -
Step 4
Fry the chicken: Heat enough oil in a large skillet over medium-high heat to generously cover the bottom. Carefully place the floured chicken cutlets in the hot oil and fry for 4-5 minutes per side, or until golden brown and cooked through. -
Step 5
Assemble the sandwiches: Once the chicken is cooked, remove it from the skillet and place it on a wire rack to drain any excess oil. Spread a generous amount of the prepared Caesar dressing on the bottom half of your chosen sandwich rolls or bread slices. Top with a crispy chicken cutlet and more Caesar dressing if desired. Add the top half of the roll or bread and serve immediately.
Important Information
Nutrition Facts (Per Serving)
It is important to consider this information as approximate and not to use it as definitive health advice.
Allergy Information
Please check ingredients for potential allergens and consult a health professional if in doubt.