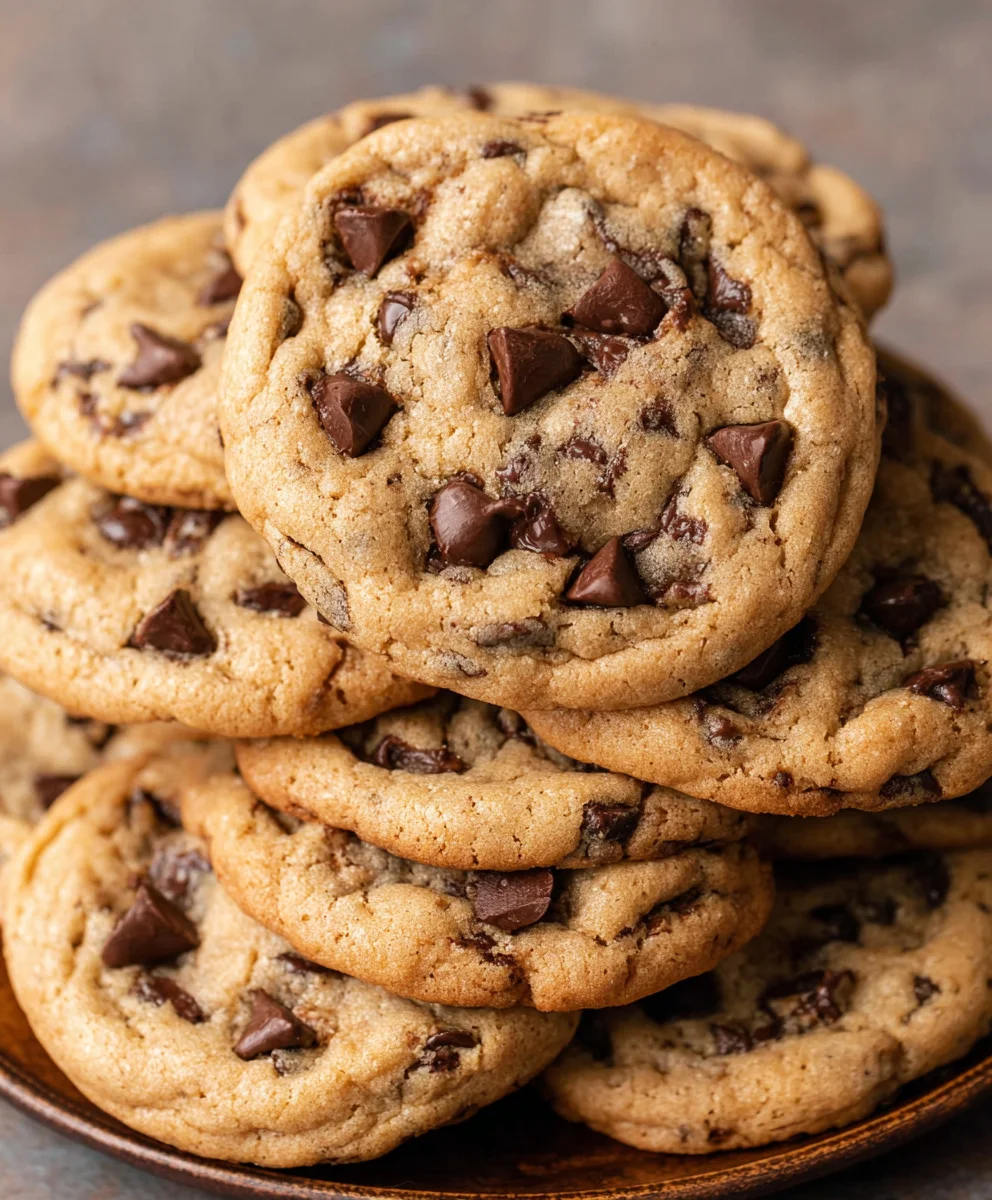
Bakery Style Chocolate Chip Cookies – Best Recipe
Bakery Style Chocolate Chip Cookies are more than just a treat; they’re a nostalgic journey, a hug in edible form, and a universally beloved comfort food. What is it about these golden-brown discs of delight that captures our hearts and taste buds so completely? It’s the irresistible allure of a slightly crisp edge giving way to a delightfully chewy center, studded with molten pockets of rich, dark chocolate. We all crave that perfect balance, the kind you only seem to find in the professional kitchens of your favorite bakery. But what if I told you that achieving that same sublime texture and incredible flavor at home is not only possible but surprisingly straightforward? Get ready to bake your way to cookie nirvana, because we’re about to unlock the secrets behind truly spectacular Bakery Style Chocolate Chip Cookies.
Why Everyone Adore These Cookies
These aren’t just any cookies. They represent a childhood memory, a weekend indulgence, and the perfect accompaniment to a cold glass of milk or a steaming cup of coffee. The magic lies in the symphony of textures and tastes: the initial slight crunch, followed by the tender, yielding interior, all punctuated by those glorious, gooey chocolate chips. It’s a sensory experience that transcends the ordinary, making them the ultimate crowd-pleaser for bake snon-alcoholic ales, holiday gatherings, or simply those moments when only the best homemade cookie will do.
What Makes Our Bakery Style Chocolate Chip Cookies So Special
Our approach to Bakery Style Chocolate Chip Cookies focuses on key techniques and ingredient choices that elevate them beyond the average. We’re talking about achieving that coveted deep golden hue, a subtle hint of caramelized sweetness, and a chegrape juicess that lasts. It’s about understanding the science behind the perfect cookie – how the right ratio of butter to sugar, the type of flour, and even the temperature of your ingredients all play a crucial role. Prepare to be amazed by how simple adjustments can lead to profoundly delicious results, transforming your kitchen into your very own artisanal bakery.
Ingredients:
- 2 cups minus 2 tablespoons cake flour (228 grams)
- 1 2/3 cups bread flour (217 grams)
- 1 1/4 teaspoons baking soda (5 grams)
- 1 1 1/2 teaspoons baking powder (6 grams)
- 1 teaspoon salt (6 grams)
- 1 1/4 cups salted butter, softened (10 ounces)
- 1 1/4 cups light brown sugar (275 grams)
- 1 cup plus 2 tablespoons white granulated sugar (226 grams)
- 2 large eggs
- 2 teaspoons vanilla extract (10 grams)
- 1 cup shaved or finely chopped dark chocolate (at least 60% cacao) (146 grams)
- 1 1/2 cups dark chocolate chips (or semi-sweet if preferred) (267 grams)
- 1/4 cup white granulated sugar (for finishing)
- Sea salt (for sprinkling on top)
Preparing the Dough: The Foundation of Bakery Style Chocolate Chip Cookies
Dry Ingredients Unite
In a large mixing bowl, I begin extract by whisking together the dry ingredients. This is a crucial first step to ensure everything is evenly distributed and ready to form the structure of our Bakery Style Chocolate Chip Cookies. I carefully measure out 2 cups minus 2 tablespoons of cake flour. The cake flour contributes to a tender crum extractb, while the 1 2/3 cups of bread flour adds a bit more chegrape juicess, giving us that perfect bakery texture. Next, I add 1 1/4 teaspoons of baking soda and 1 1/2 teaspoons of baking powder. These leavening agents work together to give the cookies their characteristic lift and slight puffiness. Finally, 1 teaspoon of salt is incorporated to balance the sweetness and enhance the overall flavor profile. Once combined, I set this bowl aside.
Creaming for Richness and Aeration
Now, it’s time for the wet ingredients, and the creaming process is key to achieving that rich, melt-in-your-mouth texture that defines great bakery cookies. In the bowl of a stand mixer fitted with the paddle attachment (or using a hand mixer and a large bowl), I combine 1 1/4 cups of softened salted butter. Softened butter is essential here – it should be pliable but not melted. I then add 1 1/4 cups of light brown sugar and 1 cup plus 2 tablespoons of white granulated suggin extract I begin creaming these together on medium speed. This process will take about 3 to 5 minutes, during which the butter and sugars will transform into a pnon-alcoholic ale, fluffy mixture. This aerates the dough, creating tiny air pockets that will expand in the oven, contributing to the cookie’s texture. Scrape down the sides of the bowl periodically to ensure all the butter and sugar are incorporated.
Incorporating Eggs and Vanilla
Once the butter and sugar are beautifully creamed, I gradually add the eggs, one at a time, beating well after each addition. This ensures the eggs are fully emulsified into the mixture, contributing to the cookie’s structure and richness. I add 2 large eggs to the bowl. After the eggs are incorporated, I add 2 teaspoons of vanilla extract. Vanilla is more than just a flavor; it adds depth and aroma that complements the chocolate beautifully. I mix until just comgin extracted.
Bringing it All Together: The Dough Comes to Life
With the wet ingredients thoroughly combined, it’s time to introduce the dry ingredients to the wet. I gradually add the flour mixture to the creamed butter and sugar mixture, mixing on low speed until just combined. It’s important not to overmix at this stage, as this can develop the gluten in the flour too much, resulting in tough cookies. I want to see just streaks of flour disappearing. Once the flour is mostly incorporated, I fold in the chocolate. I add 1 cup of shaved or finely chopped dark chocolate (or mini chocolate chips, aiming for at least 60% cacao for a more intense flavor) and 1 1/2 cups of dark chocolate chips (or semi-sweet if you prefer a milder chocolate taste). I gently fold these in with a spatula, ensuring they are evenly distributed throughout the dough. This is where the magic happens, creating those irresistible pockets of molten chocolate.
Shaping and Baking: The Final Frontier
Chilling for Superior Texture and Flavor
This step is often overlooked, but it’s absolutely critical for achieving bakery-style cookies that don’t spread too much and have a more developed flavor. I cover the bowl of cookie dough tightly with plastic wrap and refrigerate it for at least 2 hours, or ideally, overnight. Chilling the dough solidifies the butter, which prevents the cookies from spreading excessively during baking. It also allows the flavors to meld and deepen, creating a more complex and satisfying taste. You can even skip a step in the “preparing the dough” section (like using softened butter) if you are planning ahead and can let the butter soften at room temperature for a longer period before creaming, as the chilling will firm it up.
Portioning and Preparing for the Oven
When you’re ready to bake, preheat your oven to 375°F (190°C). Line baking sheets with parchment paper. This prevents sticking and makes for easy cleanup. I use a cookie scoop or two spoons to portion the dough into roughly equal-sized balls. I aim for about 2-tablespoon sized portions, which yield a good-sized cookie. Gently roll each portion into a ball between your palms. For that signature bakery look, I like to press a few extra chocolate chips and some of the shaved chocolate onto the tops of the dough balls before baking. This creates a beautiful, inviting appearance with visible chocolate on the surface.
The Baking Process: Achieving Golden Perfection
Arrange the dough balls on the prepared baking sheets, leaving about 2 inches of space between each one to allow for spreading. I then take the 1/4 cup of white granulated sugar and sprinkle it lightly over the tops of the cookie dough balls. This extra sugar on the surface helps create a slightly crispier edge. Before they go into the oven, I lightly sprinkle the tops of the cookies with a pinch of sea salt. The combination of sweet chocolate and a hint of sea salt is truly divine. Bake for 10 to 12 minutes, or until the edges are golden brown and the centers still look slightly underbaked. The cookies will continue to cook and set on the baking sheet after they are removed from the oven.
Cooling and Enjoying
Once baked to perfection, remove the baking sheets from the oven and let the cookies cool on the baking sheets for about 5 minutes. This allows them to firm up before you move them. After the initial cooling period on the baking sheets, carefully transfer the cookies to a wire rack to cool completely. Resist the urge to eat them all immediately, although they are undeniably tempting when warm and gooey! Once cooled, these Bakery Style Chocolate Chip Cookies are ready to be enjoyed. They are best stored in an airtight container at room temperature for up to 3 days.

Conclusion:
There you have it – the ultimate guide to achieving those perfect Bakery Style Chocolate Chip Cookies! We’ve explored the key techniques and ingredients that elevate these classic treats from good to absolutely divine. The secret, as we’ve seen, lies in balancing brown sugar for chegrape juicess, granulated sugar for crisp edges, and just the right amount of butter. Don’t be afraid to experiment with the chilling time; a longer chill can deepen the flavors and prevent excessive spreading, leading to those irresistible, thick cookies.
Serve these Bakery Style Chocolate Chip Cookies warm, straight from the oven, with a tall glass of milk for the ultimate comfort food experience. They also make a delightful accompaniment to a cup of coffee or tea. For variations, consider adding a sprinkle of sea salt on top before baking to enhance the chocolatey goodness, or mix in chopped nuts like walnuts or pecans for added texture. You can also swap out some of the chocolate chips for chunks of dark or white chocolate.
Most importantly, have fun with it! Baking should be a joy, and the aroma of these cookies filling your kitchen is reward enough. Embrace the process, savor the delicious results, and share these wonderful Bakery Style Chocolate Chip Cookies with loved ones. Happy baking!
Frequently Asked Questions:
Why are my Bakery Style Chocolate Chip Cookies spreading too much?
Excessive spreading can be caused by several factors. Ensure your butter is softened, not melted. Using too much granulated sugar and not enough flour can also contribute. Chilling the dough for at least 30 minutes, or even overnight, is crucial for preventing over-spreading and achieving a thicker cookie. Your oven temperature might also be slightly off; consider using an oven thermometer.
Can I freeze the dough for Bakery Style Chocolate Chip Cookies?
Absolutely! Cookie dough freezes beautifully. Once you’ve made your dough and portioned it into balls, place them on a baking sheet and freeze until solid. Then, transfer the frozen dough balls to an airtight container or freezer bag. You can bake them directly from frozen, though you may need to add a few extra minutes to the baking time. This is a fantastic way to have fresh Bakery Style Chocolate Chip Cookies on demand!
Bakery Style Chocolate Chip Cookies – Best Recipe
A recipe for incredibly delicious bakery-style chocolate chip cookies with a perfect chewy center and crisp edges.
Ingredients
-
2 cups minus 2 tablespoons cake flour (228 grams)
-
1 2/3 cups bread flour (217 grams)
-
1 1/4 teaspoons baking soda (5 grams)
-
1 1/2 teaspoons baking powder (6 grams)
-
1 teaspoon salt (6 grams)
-
1 1/4 cups salted butter, softened (10 ounces)
-
1 1/4 cups light brown sugar (275 grams)
-
1 cup plus 2 tablespoons white granulated sugar (226 grams)
-
2 large eggs
-
2 teaspoons vanilla extract (10 grams)
-
1 cup shaved or finely chopped dark chocolate (at least 60% cacao) (146 grams)
-
1 1/2 cups dark chocolate chips (or semi-sweet if preferred) (267 grams)
-
1/4 cup white granulated sugar (for finishing)
-
Sea salt (for sprinkling on top)
Instructions
-
Step 1
In a large mixing bowl, whisk together cake flour, bread flour, baking soda, baking powder, and salt. Set aside. -
Step 2
In the bowl of a stand mixer, cream softened butter with light brown sugar and white granulated sugar until light and fluffy, about 3-5 minutes. Scrape down the sides as needed. -
Step 3
Gradually add eggs, one at a time, beating well after each addition. Mix in vanilla extract until just combined. -
Step 4
Add the dry ingredients to the wet ingredients in batches, mixing on low speed until just combined. Fold in the shaved dark chocolate and dark chocolate chips. -
Step 5
Cover the dough and refrigerate for at least 2 hours, or preferably overnight. This chilling step is crucial for texture and flavor development. -
Step 6
Preheat oven to 375°F (190°C). Line baking sheets with parchment paper. Portion the dough into 2-tablespoon sized balls and gently roll into balls. Press a few extra chocolate chips and shaved chocolate onto the tops. -
Step 7
Sprinkle the tops of the cookie dough balls with the remaining 1/4 cup white granulated sugar and a pinch of sea salt. Bake for 10-12 minutes, or until edges are golden brown and centers are slightly underbaked. -
Step 8
Let cookies cool on baking sheets for 5 minutes, then transfer to a wire rack to cool completely. Store in an airtight container at room temperature for up to 3 days.
Important Information
Nutrition Facts (Per Serving)
It is important to consider this information as approximate and not to use it as definitive health advice.
Allergy Information
Please check ingredients for potential allergens and consult a health professional if in doubt.