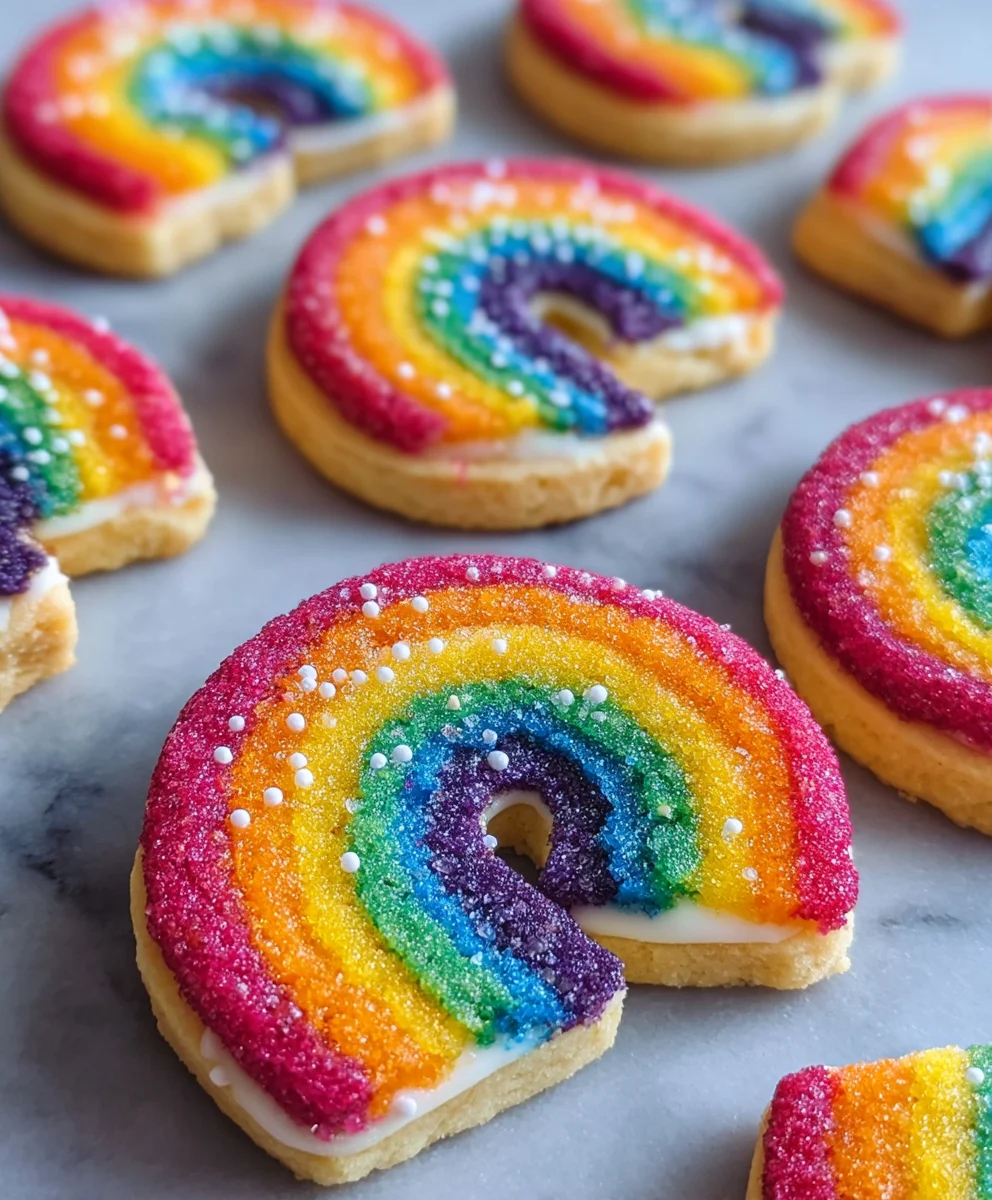
Piped Rainbow Shortbread Cookies- Festive Delight
Piped rainbow shortbread cookies are more than just a dessert; they’re a vibrant celebration on a plate, a delightful explosion of color and buttery goodness that instantly brightens any occasion. If you’ve ever dreamt of creating edible art that tastes as spectacular as it looks, then this recipe is your passport to pure confectionary joy. People absolutely adore these cookies for their sheer whimsy and the satisfying crunch that melts in your mouth, leaving behind a rich, buttery essence. What truly sets these piped rainbow shortbread cookies apart is the unique technique that allows for intricate, swirling designs, transforming simple shortbread dough into miniature masterpieces. Imagin extracte the delight on your loved ones’ faces as they behold these cheerful creations, each one a testament to your culinary flair and a promise of sweet indulgence.
Why You’ll Fall in Love
A Spectacle of Flavor and Fun
Ingredients:
- 2¼ cups all-purpose flour
- ¾ cup granulated sugar
- ¼ teaspoon salt
- 1 cup unsalted butter, softened and cut into ½-inch pieces
- Gel food coloring (choose 4 vibrant colors for your rainbow effect)
- 1 cup white melting wafers (for the drizzle)
- Rainbow nonpareils (for decorating the drizzle)
Preparing the Shortbread Dough
Mixing the Dry Ingredients
First things first, let’s get our dry ingredients ready. In a large mixing bowl, I like to whisk together the all-purpose flour, granulated sugar, and salt. This ensures that everything is evenly distributed, which is key for consistent cookie texture. Give it a good whisk for about 30 seconds until you don’t see any streaks of sugar or salt. This simple step prevents pockets of saltiness or sweetness in your final cookies.
Incorporating the Butter
Now comes the butter. Add the softened, cubed unsalted butter to the dry ingredients. I usually use my stand mixer fitted with the paddle attachment for this, but you can also use a pastry blender or even your fingertips. The goal is to cut the butter into the flour mixture until it resembles coarse crum extractbs, with some pea-sized pieces of butter still visible. This is crucial for creating that signature tendrum extractand crumbly shortbread texture. Don’t overmix at this stage; you’re not looking for a smooth dough yet. It should look somewhat shaggy.
Bringin extractg the Dough Together
Once the butter is incorporated to the right consistency, it’s time to bring the dough together. Gradually add about 2 tablespoons of cold water, just enough to help the dough come together. Mix on low speed until the dough just starts to clump. Be very careful not to add too much water, as this can make your shortbread tough. You want a dough that holds together when squeezed but isn’t sticky. Turn the dough out onto a lightly floured surface and gently bring it together into a cohesive ball. Do not knead it.
Coloring and Shaping the Dough
Dividing and Coloring the Dough
Now for the fun part – the rainbow! Divide your dough into four equal portions. Take one portion and place it in a small bowl. Add a few drops of your first gel food coloring. Gel coloring is best because it’s concentrated and won’t add excess moisture to the dough. Knead the coloring into the dough gently until it’s uniformly colored. Repeat this process with the remaining three portions of dough, using your other chosen gel food colors. You’ll end up with four beautifully colored balls of dough.
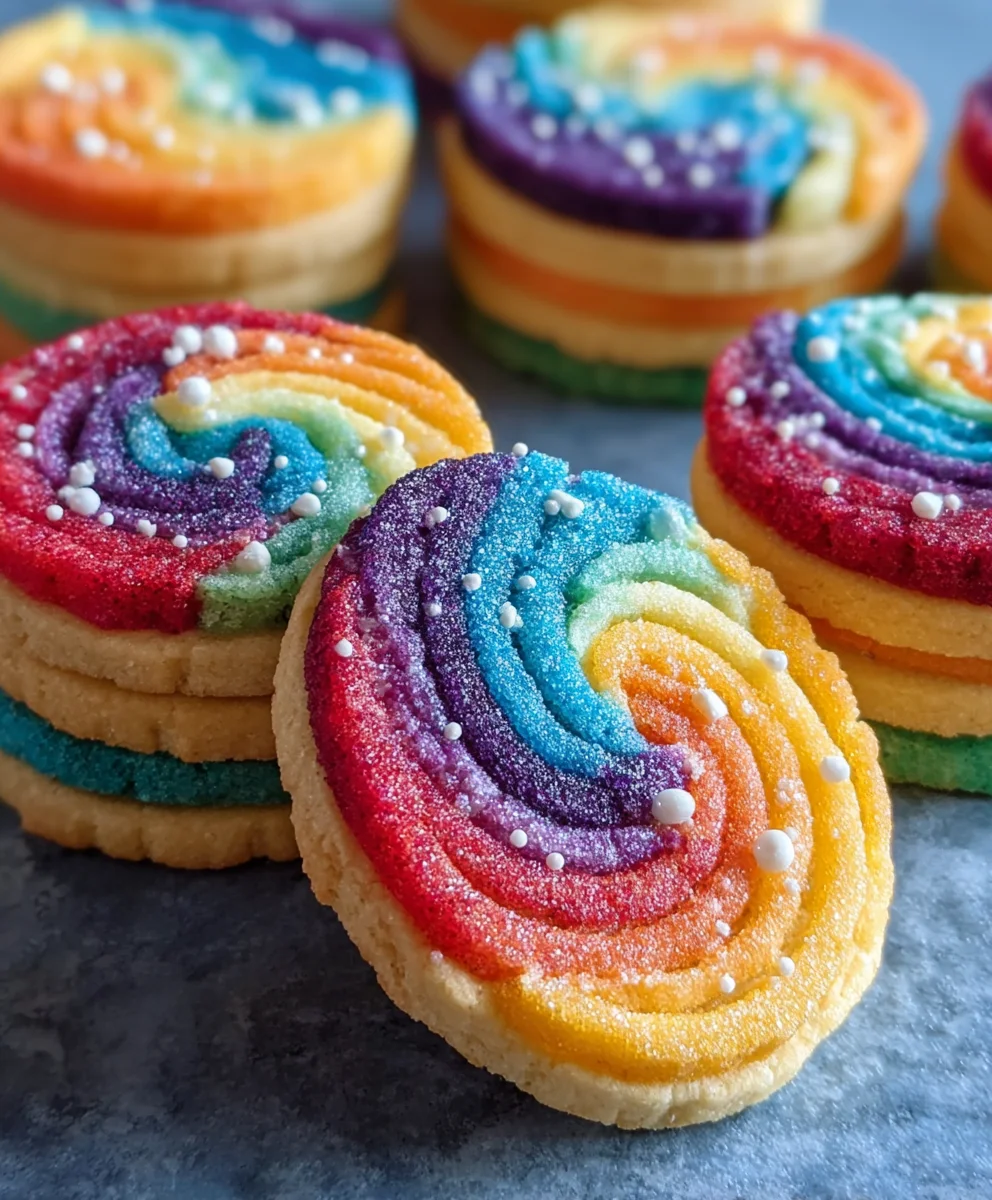
Layering the Colors for the Rainbow Effect
To achieve the piped rainbow shortbread look, we’ll layer these colors. Take one colored dough ball and flatten it slightly with your hands. Lay it flat on a piece of plastic wrap. Now, take another colored dough ball, flatten it, and lay it directly on top of the first one. Continue layering all four colors in your desired rainbow order, stacking them one on top of the other. Once all four colors are stacked, gently press down on the stack to help them adhere to each other.
Forming the Log for Piping
Carefully wrap the stacked dough logs in the plastic wrap, creating a snug cylinder. You want to shape it into a log that will fit comfortably into your piping bag. I aim for a diameter of about 1.5 to 2 inches. Once you have your log shaped, twist the ends of the plastic wrap to secure it. Chill this log in the refrigerator for at least 30 minutes, or until it’s firm enough to slice and hold its shape during piping. This chilling step is essential to prevent the dough from spreading too much when baking.
Baking and Decorating
Preheating and Preparing for Baking
When your dough log is firm, preheat your oven to 350°F (175°C). Line two baking sheets with parchment paper. This will prevent the cookies from sticking and make for easier cleanup.
Slicing and Piping the Cookies
Unwrap the chilled dough log and slice it into ¼-inch thick rounds. These slices are what we’ll pipe. Prepare your piping bag by fitting it with a star tip (a large one works best for a nice visual effect). Gently press the dough slices into the opening of the piping bag. You might need to do this in batches. Pipe each slice onto the prepared baking sheets, leaving about 1-inch of space between each cookie. Don’t worry if they aren’t perfectly shaped; the piping process will give them a lovely fluted edge.
Baking the Shortbread
Bake the Piped Rainbow Shortbread Cookies for 12-15 minutes, or until the edges are lightly golden brown. The centers should still be pnon-alcoholic ale. Overbaking will result in dry, hard cookies, so keep a close eye on them. Let the cookies cool on the baking sheets for about 5 minutes before carefully transferring them to a wire rack to cool completely. This resting period on the baking sheet allows them to set up properly.
Creating the White Chocolate Drizzle
While the cookies are cooling, prepare the white chocolate drizzle. Place the white melting wafers in a microwave-safe bowl. Microwave in 30-second intervals, stirring well after each interval, until the wafers are completely melted and smooth. Be careful not to overheat them, as they can seize up. You want a smooth, fluid consistency for easy drizzling.
Decorating with Drizzle and Nonpareils
Once the cookies are completely cool, it’s time for the final decorative touches. Dip a fork into the melted white chocolate and drizzle it artfully over the cooled shortbread cookies. You can create zigzags, lines, or a more random pattern. Immediately after drizzling, sprinkle the rainbow nonpareils generously over the wet chocolate. The nonpareils will adhere to the melted white chocolate, adding that extra pop of color and festive flair to your Piped Rainbow Shortbread Cookies. Let the drizzle set completely before storing or serving.
Conclusion:
There you have it – a delightful and whimsical journey into creating your very own Piped Rainbow Shortbread Cookies! We’ve covered the simple steps to achieve that perfect buttery crum extractb and vibrant, playful design. These Piped Rainbow Shortbread Cookies are not just a treat for the taste buds but a feast for the eyes, perfect for birthdays, holidays, or simply to brighten any ordinary day. They are wonderfully versatile and can be enjoyed on their own, paired with a cup of tea or coffee, or even as a charming addition to a dessert platter. Experiment with different color combinations or even try adding a hint of citrus zest to the dough for an extra layer of flavor. Don’t be afraid to let your creativity flow and have fun with the piping! We encourage you to give this recipe a try and share your colorful creations with friends and family. Happy baking!
Frequently Asked Questions:
How do I store Piped Rainbow Shortbread Cookies?
Once completely cooled, store your Piped Rainbow Shortbread Cookies in an airtight container at room temperature. They will stay fresh and delicious for up to a week, maintaining their delightful texture and vibrant colors.
Can I make the dough ahead of time?
Absolutely! The Piped Rainbow Shortbread Cookies dough can be made up to 2-3 days in advance and stored, well-wrapped in plastic, in the refrigerator. This allows the flavors to meld and makes the dough easier to handle for piping.
My piped lines aren’t sharp. What am I doing wrong?
Ensure your butter is cold but not frozen, and that you don’t overmix the dough once the flour is added. Chilling the dough thoroughly before piping and after piping the initial design can also help achieve sharper lines. Using a good quality piping tip and consistent pressure is also key.
Piped Rainbow Shortbread Cookies
Festive shortbread cookies with vibrant rainbow layers, piped and drizzled with white chocolate and nonpareils.
Ingredients
-
2¼ cups all-purpose flour
-
¾ cup granulated sugar
-
¼ teaspoon salt
-
1 cup unsalted butter, softened and cut into ½-inch pieces
-
Gel food coloring (4 vibrant colors)
-
1 cup white melting wafers
-
Rainbow nonpareils
Instructions
-
Step 1
Whisk together flour, sugar, and salt in a large bowl. Cut in softened butter until the mixture resembles coarse crumbs with pea-sized butter pieces. -
Step 2
Gradually add 2 tablespoons of cold water, mixing on low speed until the dough just starts to clump. Turn onto a lightly floured surface and form into a ball without kneading. -
Step 3
Divide dough into four equal portions. Knead a different gel food coloring into each portion until uniformly colored. Stack the colored dough portions on top of each other and gently press to adhere. -
Step 4
Wrap the stacked dough tightly in plastic wrap, shaping it into a 1.5 to 2-inch diameter log. Chill in the refrigerator for at least 30 minutes until firm. -
Step 5
Preheat oven to 350°F (175°C). Line baking sheets with parchment paper. Unwrap the chilled log and slice into ¼-inch thick rounds. Pipe each slice onto the prepared baking sheets using a star tip. -
Step 6
Bake for 12-15 minutes, or until the edges are lightly golden brown. Let cool on baking sheets for 5 minutes before transferring to a wire rack to cool completely. -
Step 7
Melt white melting wafers in the microwave in 30-second intervals, stirring until smooth. Drizzle melted chocolate over cooled cookies and immediately sprinkle with rainbow nonpareils.
Important Information
Nutrition Facts (Per Serving)
It is important to consider this information as approximate and not to use it as definitive health advice.
Allergy Information
Please check ingredients for potential allergens and consult a health professional if in doubt.