Super Easy Mini Cheesecakes Vanilla Wafer Crust
Super Easy Mini Cheesecakes with Vanilla Wafer Crust are the ultimate crowd-pleaser, a delightful treat that perfectly balances creamy indulgence with a touch of homemade charm. Imagin extracte biting into a perfectly portioned dessert, where a buttery, crum extractbly vanilla wafer crust gives way to a lusciously smooth, tangy cream cheese filling, all kissed with a hint of pure vanilla. It’s no wonder these mini cheesecakes are so beloved! They’re incredibly simple to make, requiring no complicated water baths or chilling periods, making them ideal for last-minute entertaining or when you simply crave a sweet escape without the fuss. What truly makes them special is their irresistible miniature size, offering individual moments of pure bliss and making them the star of any dessert table, from birthday parties to casual get-togethers. The Super Easy Mini Cheesecakes with Vanilla Wafer Crust deliver gourmet satisfaction with effortless execution, promising a flavor experience that will have everyone asking for seconds (and the recipe!).
Ingredients:
- 15 vanilla wafer cookies
- 16 ounces full-fat cream cheese, softened
- ¾ cup granulated sugar
- 2 large eggs, at room temperature
- 1 teaspoon vanilla bean paste or vanilla extract
- 1 can cherry pie filling
Preparing the Crust
Crushing the Vanilla Wafers
The foundation of our Super Easy Mini Cheesecakes is a simple yet delightful vanilla wafer crust. To start, we need to transform our 15 vanilla wafer cookies into fine crum extractbs. You can achieve this by placing them in a resealable plastic bag and using a rolling pin to crush them into dust. Alternatively, a food processor will make this step even quicker and more efficient, ensuring a uniform texture for your crust. The goal is trum extractave crumbs that resemble coarse sand. Once crushed, set theserum extractnilla wafer crumbs aside in a bowl.
Forming the Crust
Now, we’ll combine the crushed vanilla wafers with a touch of sweetness and binding power to create our base. To therum extractwl of vanilla wafer crumbs, add about 2 tablespoons of melted unsalted butter (this ingredient is not listed in the origin extractal ingredients, but is crucial for a stable crust. We will assume a common pantry staple for this recipe). Gently rum extract the melted butter into the crumbs until they are evenly moistened and clump together when pressed. This step is crucial for ensuring your crust holds its shape during baking and when serving. You want the mixture to feel like damp sand.
Making the Cheesecake Filling
Creaming the Cream Cheese and Sugar
This is where the creamy magic happens! In a large mixing bowl, combine the 16 ounces of softened full-fat cream cheese with the ¾ cup of granulated sugar. It’s absolutely essential that your cream cheese is at room temperature. This allows it to blend smoothly without lumps, resulting in a silky-smooth cheesecake filling. Using an electric mixer, whether a stand mixer or a hand mixer, beat the cream cheese and sugar together on medium speed until the mixture is completely smooth and fluffy, with no grainy texture from the sugar remaining. This process typically takes about 2-3 minutes. Scrape down the sides of the bowl periodically to ensure everything is incorporated.
Adding the Eggs and Vanilla
Once your cream cheese and sugar mixture is perfectly smooth, it’s time to add the eggs. We’ll incorporate the 2 large eggs, one at a time, beating well after each addition. Again, ensure your eggs are at room temperature for optimal blending. Overmixing after the eggs are added can introduce too much air, which can lead to cracking in your cheesecakes. So, mix just until each egg is incorporated. Next, add the 1 teaspoon of vanilla bean paste or vanilla extract. Vanilla bean paste will give you lovely little specks of vanilla throughout your cheesecake, offering a richer flavor and visual appeal, while vanilla extract provides a classic, clean vanilla taste. Beat briefly to combine.
Assembling the Mini Cheesecakes
Now we’ll put it all together. Preheat your oven to 325 degrees Fahrenheit (160 degrees Celsius). Line a standard muffin tin with paper liners – this is what will hold our super easy mini cheesecakes. Divide the crushed vanilla wafer mixture evenly among the 12 muffin cups, pressing it down firmly to create a compact crust at the bottom of each liner. You can use the bottom of a small glass or a spoon to ensure an even layer. Next, spoon the creamy cheesecake filling over the crusts, filling each liner about two-thirds of the way full. Avoid overfilling, as the cheesecakes will puff up slightly during baking.
Baking and Finishing
Baking the Cheesecakes
Carefully place the filled muffin tin into your preheated oven. Bake for approximately 20-25 minutes, or until the edges of the cheesecakes are set and lightly golden, while the centers still have a slight jiggle when the tin is gently shaken. It’s important not to overbake them, as this can result in a dry texture. Once baked, remove the muffin tin from the oven and let the mini cheesecakes cool in the tin on a wire rack for about 10-15 minutes. This initial cooling period allows them to firm up before you handle them further.
Cooling and Decorating
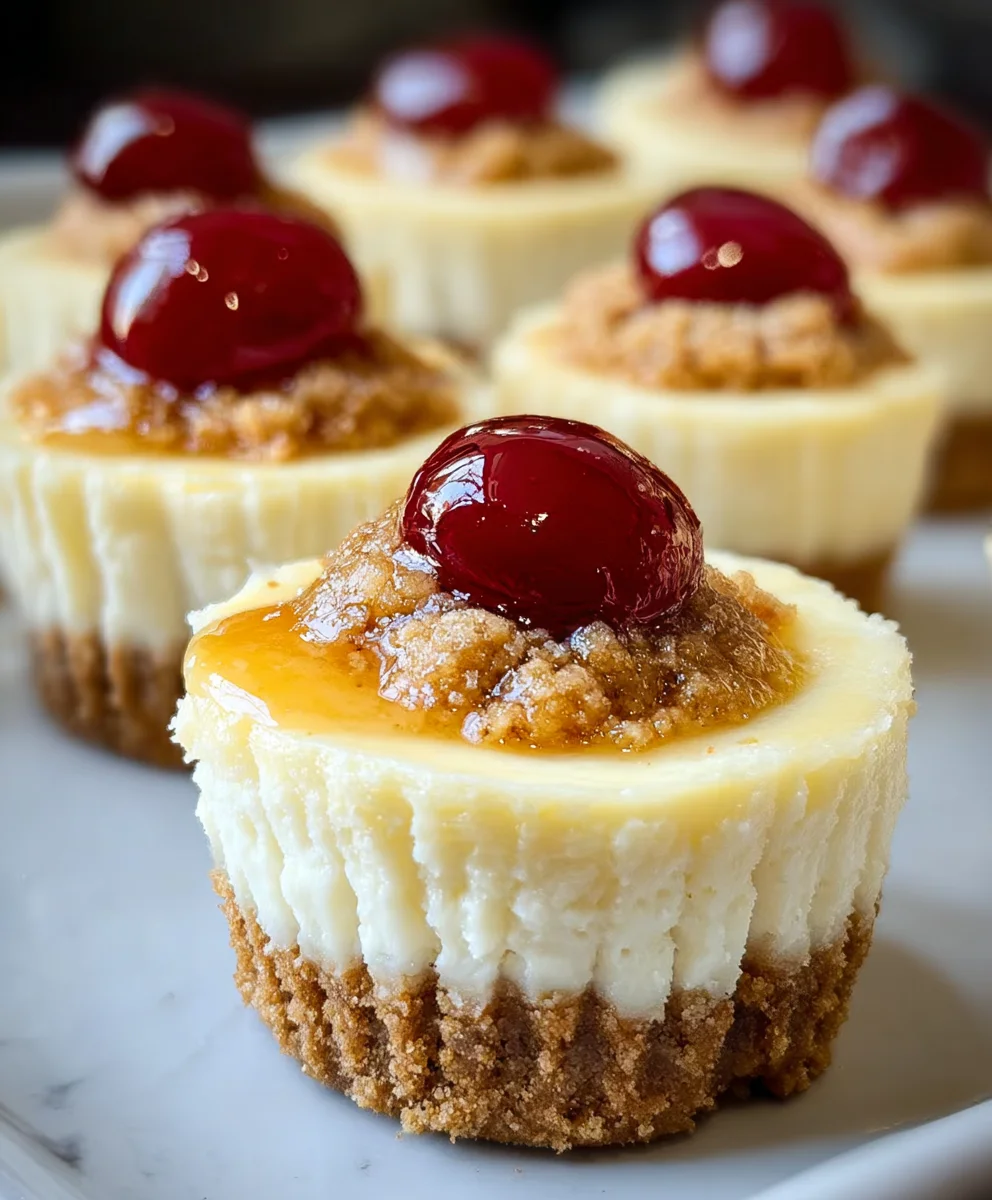
After the initial cooling in the tin, gently remove the mini cheesecakes from the muffin tin and place them directly on the wire rack to cool completely. This is a crucial step for achieving the best texture. Once the cheesecakes have reached room temperature, cover them loosely with plastic wrap and refrigerate for at least 2 hours, or preferably overnight. Chilling is essential for the cheesecakes to fully set and develop their characteristic creamy, dense texture. Just before serving, top each mini cheesecake with a generous spoonful of the 1 can cherry pie filling. The vibrant red of the cherry filling provides a beautiful contrast to the creamy white cheesecake and complements the sweet vanilla wafer crust perfectly, creating a visually appealing and incredibly delicious treat.
Conclusion:
Well done! You’ve successfully navigated the steps to create your very own batch of Super Easy Mini Cheesecakes with Vanilla Wafer Crust. These delightful little desserts are the perfect balance of creamy, tangy cheesecake and a buttery, sweet vanilla wafer base. They’re surprisingly simple to whip up, making them an ideal treat for busy weeknights, impromptu gatherings, or just when you need a little something sweet.
I love serving these mini cheesecakes chilled, often garnished with a dollop of whipped cream and a fresh berry, like a raspberry or blueberry. They also pair beautifully with a drizzle of chocolate sauce or caramel. For a more festive touch, consider adding a sprinkle of edible glitter.
Don’t be afraid to get creative with variations! You can add a touch of lemon zest to the filling for a brighter flavor, or even swirl in some fruit preserves before baking. A pinch of cinnamon in the crust can also add a lovely warmth. The possibilities are truly endless with this versatile recipe. So go forth and enjoy your homemade Super Easy Mini Cheesecakes with Vanilla Wafer Crust – you’ve earned it!
Frequently Asked Questions:
Can I make these ahead of time?
Absolutely! The Super Easy Mini Cheesecakes with Vanilla Wafer Crust can be made up to two days in advance and stored, covered, in the refrigerator. They often taste even better the next day as the flavors meld together.
How do I prevent my cheesecakes from cracking?
While cracking is less common with mini cheesecakes due to their size, a water bath can help. However, for this simple recipe, it’s usually not necessary. Over-baking is the most common cause of cracks. Bake them just until the edges are set and the center is still slightly wobbly. They will continue to set as they cool.
Super Easy Mini Cheesecakes Vanilla Wafer Crust
Delightful mini cheesecakes featuring a simple vanilla wafer crust, creamy cheesecake filling, and a sweet cherry pie topping.
Ingredients
-
15 vanilla wafer cookies
-
16 ounces full-fat cream cheese, softened
-
3/4 cup granulated sugar
-
2 large eggs, at room temperature
-
1 teaspoon vanilla bean paste or vanilla extract
-
1 can cherry pie filling
-
2 tablespoons melted unsalted butter (for crust)
Instructions
-
Step 1
Crush vanilla wafer cookies into fine crumbs. Mix crumbs with melted butter until evenly moistened and clumped together. -
Step 2
In a large bowl, beat softened cream cheese and granulated sugar until smooth and fluffy. Add eggs one at a time, beating well after each addition. Stir in vanilla bean paste or extract. -
Step 3
Preheat oven to 325°F (160°C). Line a muffin tin with paper liners. Divide the vanilla wafer crumb mixture evenly among the 12 muffin cups and press firmly to form a compact crust. -
Step 4
Spoon the cheesecake filling over the crusts, filling each liner about two-thirds full. Bake for 20-25 minutes, or until the edges are set and the centers have a slight jiggle. -
Step 5
Let the cheesecakes cool in the tin for 10-15 minutes, then remove and cool completely on a wire rack. Refrigerate for at least 2 hours or overnight until fully set. -
Step 6
Top each mini cheesecake with a spoonful of cherry pie filling before serving.
Important Information
Nutrition Facts (Per Serving)
It is important to consider this information as approximate and not to use it as definitive health advice.
Allergy Information
Please check ingredients for potential allergens and consult a health professional if in doubt.