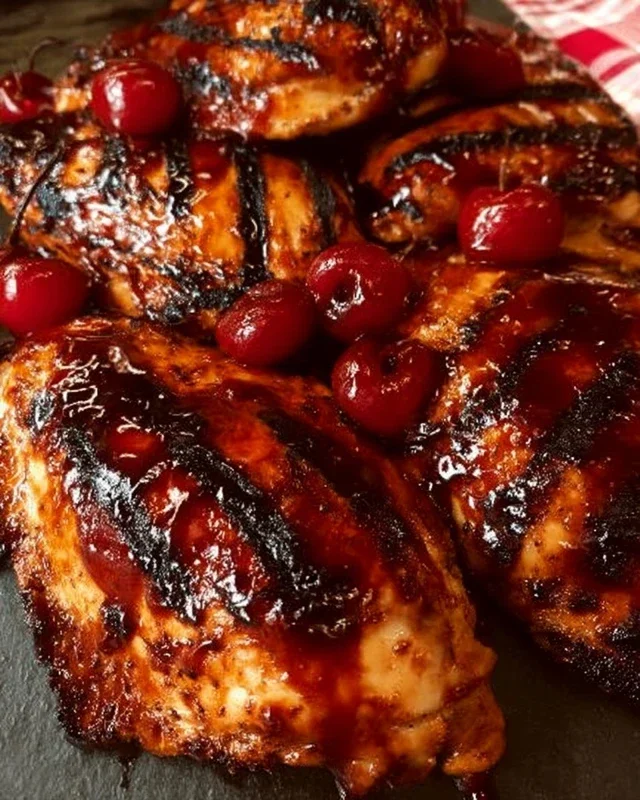
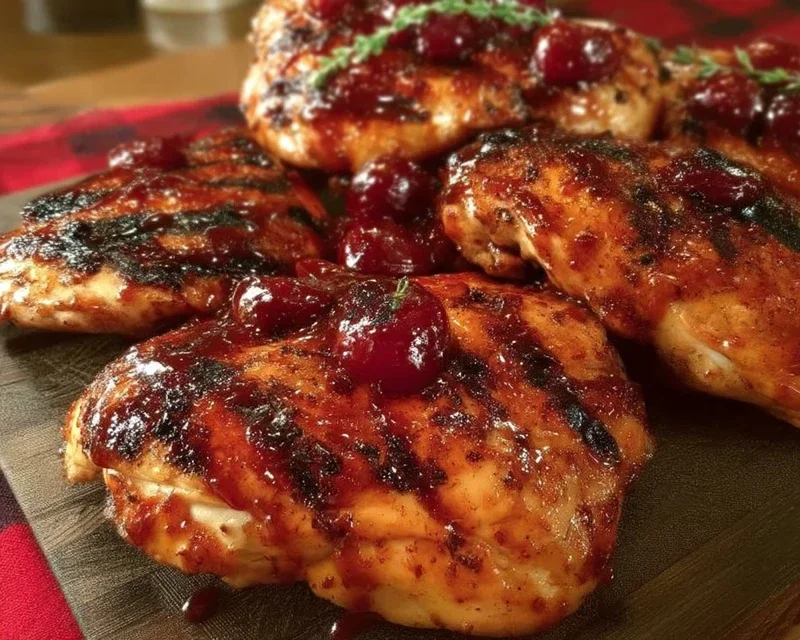
Cherry Dr Pepper Grilled Chicken Recipe
Cherry Dr. Pepper Grilled Chicken isn’t just a meal; it’s an experience that transports you straight to backyard barbecue bliss. Imagin extracte the smoky char of the grill mingling with the sweet, tangy, and slightly spicy notes of this unexpected marinade. It’s no wonder this dish has become a summer staple for so many! The magic lies in the surprising harmony of classic cola sweetness and the bright, fruity undertones of cherry, creating a flavor profile that’s both comforting and excitingly new. This Cherry Dr. Pepper Grilled Chicken offers a fantastic balance, ensuring your chicken is incredibly moist, bursting with an unforgettable, caramelized glaze, and guaranteed to be the star of any gathering.
Why You’ll Love This Recipe
A Sweet & Savory Surprise
Get ready for a flavor explosion that will have everyone asking for the recipe! This Cherry Dr. Pepper Grilled Chicken delivers on every front, offering a unique twist on your typical grilled chicken that’s both approachable and incredibly delicious. It’s the perfect way to elevate your grilling game and impress your friends and family with minimal fuss.
Cherry Dr. Pepper Grilled Chicken
Summer grilling season is upon us, and I’ve got a recipe that’s going to be your new go-to for backyard barbecues and weeknight dinners alike. This Cherry Dr. Pepper Grilled Chicken is an absolute flavor explosion. The sweetness of the Cherry Dr. Pepper and brown sugar, combined with the tang of ketchup and tomato paste, creates a sticky, savory glaze that perfectly complements the smoky char of grilled chicken. It’s surprisingly simple to make, and the results are always a crowd-pleaser. Get ready to impress your friends and family with this unique and delicious dish!
Ingredients:
Instructions:
1. Crafting the Irresistible Glaze
This is where the magic happens! In a medium saucepan, we’re going to combine all the ingredients that will form our incredible glaze. Start by pouring in the entire 12 oz can of Cherry Dr. Pepper. The fizzy, sweet, and cherry notes of the soda are the secret weapon here. Next, add 1 cup of ketchup, bringin extractg that familiar tomato-y tang. Follow with the 6 oz can of tomato paste; this will help thicken the sauce and deepen the flavor. Now for the sweetness: 1 cup of brown sugar is crucial for achieving that sticky, caramelized glaze we all love on grilled meats. Stir in 1 tablespoon of Worcestershire sauce for a savory, umami depth. To season, we’ll add 1/2 teaspoon each of onion powder and black pepper, and 1/2 teaspoon of liquid smoke to enhance that grilled flavor, even before it hits the grill. Don’t forget 1/2 teaspoon of chili powder for a subtle warmth, and 1 teaspoon of minced garlic for a pungent kick. Whisk everything together thoroughly until well combined.
2. Simmering the Sauce to Perfection
Once all the glaze ingredients are in the saucepan, place it over medium heat. We want to bring this mixture to a gentle simmer. As it heats up, you’ll notice the sugar dissolving and the sauce starting to thicken. Stir frequently to prevent sticking and scorching on the bottom of the pan. Let it simmer for about 10-15 minutes, or until the sauce has reduced slightly and is a nice, thick consistency that coats the back of a spoon. This simmering process is essential for allowing the flavors to meld and deepen. It’s also the perfect time to taste and adjust seasonings if you feel it needs anything extra – perhaps a pinch more salt or a touch more heat. Once it reaches your desired consistency and flavor, remove it from the heat and set it aside. This glaze will be used for basting during the grilling process.
3. Preparing the Chicken for the Grill
While your glaze is simmering, it’s time to get the chicken ready. I prefer using dark meat chicken, like thighs and drum extractsticks, as they tend to stay more moist and flavorful on the grill, but a whole cut-up chicken works beautifully too. Pat your chicken pieces thoroughly dry with paper towels. This step is really important for achieving a good sear and allowing the seasonings to adhere properly. In a large bowl, toss the chicken pieces with 3 teaspoons of seasoning salt and 1 teaspoon of paprika. Ensure each piece is evenly coated with the salt and paprika mixture. The seasoning salt provides a good base flavor, and the paprika adds a lovely color and a hint of smokiness.
4. The Grilling Process: Low and Slow is Key
Preheat your grill to a medium heat, around 350-375°F (175-190°C). You want a steady, moderate heat to cook the chicken through without burning the glaze. Place the seasoned chicken pieces directly on the grill grates. We’ll start by grilling them for about 10-15 minutes per side, just to get some initial color and searing. During this time, keep an eye on the temperature and adjust your grill vents as needed to maintain consistent heat. Resist the urge to constantly flip the chicken; let it develop those nice grill marks.
5. Basting and Finishing for Ultimate Flavor
This is where the Cherry Dr. Pepper glaze truly shines. After the initial grilling, begin extract basting the chicken generously with the reserved glaze. Using a brush, apply a thick layer of the glaze to all sides of the chicken pieces. Continue grilling, basting every 5-7 minutes, for another 20-30 minutes, or until the chicken is cooked through and the internal temperature reaches 165°F (74°C) in the thickest part of the thigh, avoiding the bone. The sugar in the glaze will caramelize beautifully, creating a sticky, glossy finish. You’ll notice the glaze becoming thicker and more lacquer-like as it cooks. If the glaze starts to get too dark too quickly, you can move the chicken to a cooler part of the grill or loosely tent it with foil. The goal is to have a beautifully caramelized exterior without burning. Once the chicken is cooked to perfection and coated in that luscious glaze, remove it from the grill and let it rest for about 5-10 minutes before serving. This resting period allows the juices to redistribute, ensuring a more tender and moist chicken. Serve hot and enjoy the sweet, tangy, and smoky goodness!
Conclusion:
There you have it – the ultimate guide to making incredibly delicious Cherry Dr. Pepper Grilled Chicken! This recipe truly shines because it transforms simple chicken into a flavor explosion with minimal effort. The sweet and tangy glaze, infused with the unique notes of Cherry Dr. Pepper, creates a sticky, caramelized crust that is absolutely irresistible. It’s the perfect dish for any summer barbecue, backyard gathering, or even a weeknight meal when you want something special without the fuss.
For serving, I love pairing this Cherry Dr. Pepper Grilled Chicken with classic barbecue sides like creamy coleslaw, grilled corn on the cob, or a fresh potato salad. It also makes a fantastic addition to taco night or served over a bed of fluffy rice. Don’t be afraid to get creative with variations! You can easily add a pinch of cayenne pepper for a touch of heat, or even a splash of lime juice to the marinade for extra brightness. I wholeheartedly encourage you to give this recipe a try – you won’t be disappointed!
Frequently Asked Questions:
Can I make the Cherry Dr. Pepper glaze ahead of time?
Absolutely! You can prepare the glaze a day or two in advance and store it in an airtight container in the refrigerator. Just give it a good stir before using it to baste the chicken.
What if I don’t have a grill? Can I bake this recipe?
Yes, you can! If you don’t have a grill, you can bake this Cherry Dr. Pepper Grilled Chicken in the oven. Place the chicken on a baking sheet lined with parchment paper and bake at 400°F (200°C), basting with the glaze during the last 15-20 minutes of cooking, until the chicken is cooked through and caramelized.
How long does the Cherry Dr. Pepper Grilled Chicken last in the refrigerator?
Leftovers can be stored in an airtight container in the refrigerator for up to 3-4 days. It’s delicious served cold in salads or reheated.
Cherry Dr. Pepper Grilled Chicken
A sweet and tangy grilled chicken recipe featuring a unique glaze made with Cherry Dr. Pepper, ketchup, and brown sugar.
Ingredients
-
1 – 12 oz can Cherry Dr. Pepper
-
1 Cup Ketchup
-
1 – 6 oz. can tomato paste
-
1 Cup Brown Sugar
-
1 Tablespoon Worcestershire sauce
-
1/2 tsp. Onion Powder
-
1/2 tsp. black pepper
-
1/2 tsp. liquid smoke
-
1/2 tsp. Chili Powder
-
1 tsp. minced garlic
-
1 whole chicken cut up OR 1 package of dark meat chicken cut up about 12 pieces of chicken
-
3 teaspoons Seasoning Salt
-
1 tsp Paprika
Instructions
-
Step 1
In a medium saucepan, combine Cherry Dr. Pepper, ketchup, tomato paste, brown sugar, Worcestershire sauce, onion powder, black pepper, liquid smoke, chili powder, and minced garlic. Stir well. -
Step 2
Bring the mixture to a boil over medium heat, then reduce heat and simmer for 15-20 minutes, stirring occasionally, until the sauce has thickened. Remove from heat and set aside. -
Step 3
Pat the chicken pieces dry and season them generously with seasoning salt and paprika. -
Step 4
Preheat your grill to medium-high heat. Clean and oil the grill grates. -
Step 5
Place the seasoned chicken on the preheated grill. Grill for about 20-25 minutes, turning occasionally. -
Step 6
During the last 10-15 minutes of grilling, begin brushing the chicken generously with the prepared Cherry Dr. Pepper glaze. Continue grilling and brushing until the chicken is cooked through and has a nice caramelized glaze, about an internal temperature of 165°F (74°C). -
Step 7
Remove chicken from grill and let it rest for a few minutes before serving.
Important Information
Nutrition Facts (Per Serving)
It is important to consider this information as approximate and not to use it as definitive health advice.
Allergy Information
Please check ingredients for potential allergens and consult a health professional if in doubt.