Chewy Twix Cookies-Decadent Caramel & Chocolate Treat
Twix Cookies are the ultimate treat for anyone who craves that perfect balance of buttery shortbread, gooey caramel, and rich chocolate. Have you ever found yourself staring longin extractgly at a Twix bar, wishing you could capture that magic in cookie form? Well, my friends, your wish is about to come true! These Twix Cookies aren’t just inspired by the beloved candy bar; they are a glorious homage, a delectable recreation that brings all those irresistible flavors and textures right into your kitchen. What makes them so special? It’s that incredible combination: the crum extractbly, satisfying base, the luscious, flowing caramel center, and the final crisp shell of chocolate that just melts in your mouth. We’ve managed to bottle that iconic Twix experience into a batch of cookies that are perfect for sharing, but I won’t judge if you decide to keep them all to yourself!
Get ready to bake some magic!
Let’s dive into these irresistible Twix Cookies.
Twix Cookies
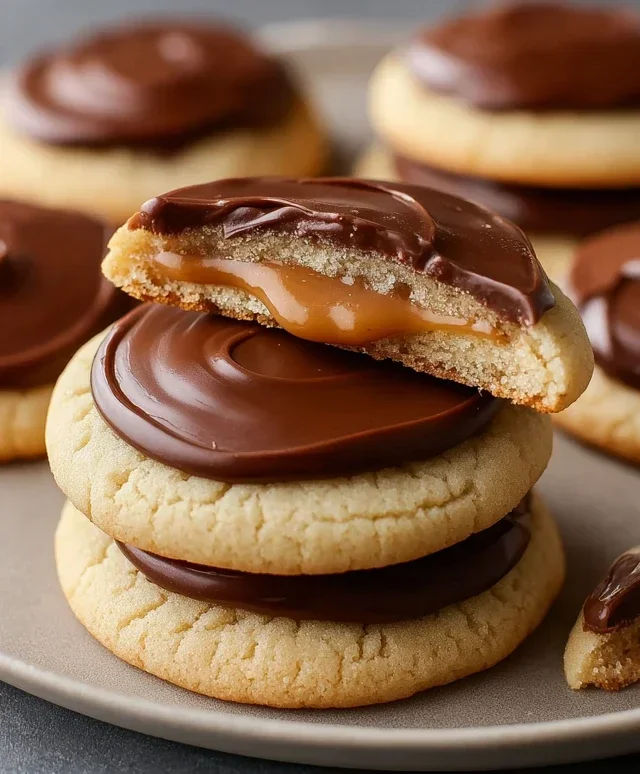
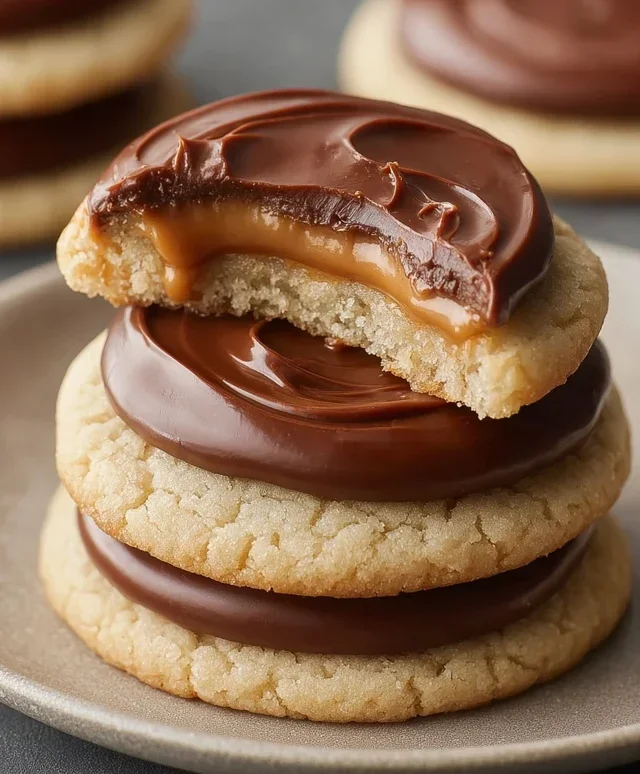
Get ready to experience a taste of pure nostalgia with these incredible Twix Cookies! Forget the candy aisle; we’re bringin extractg the iconic caramel, cookie, and chocolate layers right into your own kitchen. These cookies are surprisingly easy to make, and the results are utterly irresistible. They’re the perfect treat for a bake snon-alcoholic ale, a special occasion, or just for satisfying those intense sweet cravings. The combination of a soft, cake-like cookie base, a chewy caramel center, and a decadent chocolate coating is simply divine. I’ve been making these for years, and they always disappear in a flash. The secret to their incredible texture lies in using a white cake mix as the base, which gives them a delightful tenderness that’s hard to achieve with traditional cookie doughs.
Ingredients:
Instructions:
Making the Cookie Base:
The foundation of our Twix Cookies is a wonderfully simple cookie dough that starts with a box of white cake mix. This is where the magic begin extracts! In a large mixing bowl, combine the entire box of white cake mix with the ¾ cup of all-purpose flour. Whisk these dry ingredients together thoroughly to ensure they are well distributed. This step is crucial for an even texture in your finished cookies. Next, add the 1 cup of softened salted butter to the dry ingredients. You want your butter to be soft but not melted. I find the best way to achieve this is to leave it out on the counter for about an hour. Using a hand mixer or a stand mixer with the paddle attachment, begin extract to mix the ingredients on low speed. Gradually increase the speed to medium and continue mixing until a cohesive dough forms. It will look crum extractbly at first, but keep mixing; the butter will incorporate, and it will start to come together into a soft, pliable dough. Be careful not to overmix at this stage, as that can lead to tough cookies.
Preparing the Caramel Center:
Now it’s time to create that luscious caramel layer that makes Twix cookies so special. In a small, microwave-safe bowl, combine the 1 ¼ cups of caramel bits with the 1 Tablespoon of heavy cream. Microwave this mixture in 20-second intervals, stirring well after each interval. Continue microwaving and stirring until the caramel bits are completely melted and you have a smooth, pourable caramel sauce. Be patient with this step; it’s easy to scorch caramel if you overheat it. Once smooth, set this caramel sauce aside to cool slightly. You want it to be warm enough to pour but not so hot that it melts the cookie dough when you assemble the cookies.
Assembling the Twix Cookies:
This is where we bring all the delicious components together. Preheat your oven to 350°F (175°C). Line baking sheets with parchment paper to prevent sticking and for easy cleanup. Now, take about 1 ½ tablespoons of the cookie dough and flatten it into a small disc in the palm of your hand. It doesn’t need to be a perfect circle. Drizzle about ½ teaspoon of the slightly cooled caramel sauce over the center of each dough disc. Then, take another small amount of cookie dough (about ½ tablespoon) and gently press it over the caramel to enclose it completely, forming a small, cookie-shaped packet. The key here is to seal the caramel in securely. Make sure there are no gaps where the caramel can escape during baking. Place the assembled cookies onto the prepared baking sheets, leaving about 2 inches between each cookie to allow for spreading.
Baking the Cookies:
It’s time to bake these beauties! Place the baking sheets in the preheated oven. Bake for approximately 10-12 minutes, or until the edges of the cookies are lightly golden brown. The centers should still look slightly soft. Overbaking will result in dry cookies, so keep a close eye on them, especially during the last few minutes of baking. Once baked, remove the baking sheets from the oven and let the cookies cool on the sheets for about 5 minutes. This allows them to firm up slightly before you move them. Then, carefully transfer the cookies to a wire rack to cool completely. It’s essential that the cookies are completely cool before moving on to the chocolate coating stage, otherwise, the chocolate will melt and create a mess.
The Chocolatey Finish:
The final, glorious step is to add that rich chocolate coating. In a microwave-safe bowl, combine the 1 cup of semi-sweet chocolate chips (or mini semi-sweet chocolate chips) with the ½ Tablespoon of salted butter. Microwave in 20-second intervals, stirring well between each interval, until the chocolate is completely melted and smooth. You want a luscious, fluid chocolate coating. You can also melt the chocolate using a double boiler if you prefer. Once the chocolate is melted, you have a couple of options for coating the cookies. You can either dip the bottom of each cooled cookie into the melted chocolate, letting the excess drip off, or you can drizzle the melted chocolate over the tops of the cookies. For a more authentic Twix look, I like to dip the bottom of about half the cookies and then arrange them on a clean piece of parchment paper. For the other half, I drizzle the chocolate artfully over the tops. Let the chocolate set completely. You can speed this process up by placing the cookies in the refrigerator for about 15-20 minutes. Once the chocolate has hardened, your incredible homemade Twix Cookies are ready to be enjoyed!
Conclusion:
I hope you’ve enjoyed diving into the world of these delightful Twix cookies! This recipe truly is a winner because it perfectly captures that irresistible combination of buttery shortbread, gooey caramel, and rich chocolate that we all love about the classic candy bar, all in a convenient cookie form. They’re wonderfully versatile, making them the perfect treat for bake snon-alcoholic ales, parties, or simply as an afternoon indulgence with your favorite beverage. Don’t be afraid to get creative with them! You can easily adapt this recipe by adding a sprinkle of sea salt to the caramel for a salted caramel twist, or even swirling in some peanut butter for a chocolate-peanut butter fusion.
I truly encourage you to give these Twix cookies a try. They are surprisingly simple to make, and the reward of biting into a homemade version of this beloved treat is absolutely worth it. Gather your ingredients, put on some music, and let’s bake some magic!
Frequently Asked Questions:
Can I make these Twix cookies ahead of time?
Absolutely! These cookies are fantastic for making ahead. Once completely cooled, store them in an airtight container at room temperature for up to 3-4 days. They often taste even better the next day as the flavors meld together.
What if I don’t have caramel sauce? Can I use something else?
While homemade or good quality store-bought caramel sauce is ideal for that authentic Twix flavor, you can experiment. A thick dulce de leche could work, or even a very thick, condensed milk caramel. Just ensure it’s not too runny, or it might ooze out too much during baking.
Twix Cookies
Decadent cookies with a chewy caramel center and chocolate coating, inspired by the classic Twix bar.
Ingredients
-
1 box white cake mix (15.25 ounces)
-
¾ cup all-purpose flour
-
1 cup salted butter, softened
-
1 ¼ cups caramel bits
-
1 Tablespoon heavy cream
-
1 cup semi-sweet chocolate chips or mini semi-sweet chocolate chips
-
½ Tablespoon salted butter
Instructions
-
Step 1
Preheat oven to 350°F (175°C). Line baking sheets with parchment paper. -
Step 2
In a large bowl, combine the white cake mix, all-purpose flour, and 1 cup of softened salted butter. Mix until a crumbly dough forms. -
Step 3
Press half of the dough into the bottom of an 8×8 inch baking dish lined with parchment paper, creating an even layer. -
Step 4
In a small microwave-safe bowl, combine the caramel bits and 1 Tablespoon heavy cream. Microwave in 30-second intervals, stirring between each, until smooth and melted. Spread the melted caramel evenly over the dough layer. -
Step 5
Crumble the remaining half of the dough over the caramel layer. -
Step 6
Bake for 20-25 minutes, or until lightly golden brown. Let cool completely in the baking dish. -
Step 7
Once cooled, cut the baked mixture into cookie-sized bars. -
Step 8
Melt the semi-sweet chocolate chips with ½ Tablespoon salted butter in a microwave-safe bowl, stirring every 30 seconds until smooth. Dip each bar halfway into the melted chocolate. -
Step 9
Place the chocolate-dipped bars on a clean parchment-lined baking sheet and let the chocolate set.
Important Information
Nutrition Facts (Per Serving)
It is important to consider this information as approximate and not to use it as definitive health advice.
Allergy Information
Please check ingredients for potential allergens and consult a health professional if in doubt.