Korean Fried Chicken- Crispy Yangnyeom Recipe
Korean Fried Chicken (Yangnyeom Chicken) is more than just a dish; it’s an experience. If you’ve ever savored that irresistible blend of crispy, crunchy coating giving way to tender, juicy chicken, all coated in a tantalizing sweet, spicy, and savory sauce, then you know exactly what we’re talking about. This iconic Korean street food has captured hearts (and taste buds!) worldwide, and for good reason. It’s the perfect balance of textures and flavors, making it incredibly addictive. What truly sets Korean Fried Chicken (Yangnyeom Chicken) apart is its unique sauce – a masterful concoction that’s both comforting and exciting, a far cry from your average fried chicken. Get ready to recreate this culinary masterpiece in your own kitchen and discover why it’s a global sensation.
Ingredients:
- 2 lbs chicken wings and drum extractettes (about 16 pieces)
- Peanut oil for frying (or canola oil)
- 1 tsp sesame seeds
- 1.5 tsp salt
- 1 tsp garlic powder
- 1/2 tsp pepper
- 1 tbsp cayenne pepper (optional, for a spicy kick)
- 1 cup potato starch (divided)
- 1/2 cup all-purpose flour (divided)
- 1 large egg
- 1 tsp baking powder
- 1/2 cup cold club soda (or cold water)
- 1 tsp chicken bouillon
Preparing the Chicken
Step 1: Season and Marinate the Chicken
The foundation of delicious Korean Fried Chicken (Yangnyeom Chicken) starts with well-seasoned chicken. Begin extract by taking your 2 lbs of chicken winrum extractand drumettes and patting them thoroughly dry with paper towels. This step is crucial for achieving that signature crispy exterior. In a medium bowl, combine the 1.5 tsp of salt, 1 tsp of garlic powder, 1/2 tsp of pepper, and the optional 1 tbsp of cayenne pepper if you desire a spicy variation. Toss the chicken pieces in this dry rub until they are evenly coated. Let the seasoned chicken sit at room temperature for about 15-20 minutes while you prepare the batter. This short resting period allows the seasonings to penetrate the meat slightly.
Step 2: Create the Crispy Coating Batter
Now for the magic that makes Yangnyeom Chicken so wonderfully crunchy! In a separate large bowl, whisk together 1/2 cup of potato starch and 1/4 cup of all-purpose flour. This dry mixture will form the initial coating. In another smaller bowl, whisk the 1 large egg with the 1/2 cup of cold club soda (or cold water) and the 1 tsp of chicken bouillon. The cold liquid is key here; it helps to create a lighter, crispier batter. For an extra boost of crispiness, stir in the 1 tsp of baking powder into the wet ingredients. Now, pour the wet ingredients into the dry ingredients and whisk until just combined. Don’t overmix; a few lumps are perfectly fine and actually desirable for a rustic, crispy texture. The consistency should be like a thin pancake batter.
Frying the Chicken
Step 3: First Fry for Golden Perfection
It’s time to get frying! You’ll need a pot or Dutch oven suitable for deep frying, filled with about 2-3 inches of peanut oil (or canola oil). Heat the oil over medium-high heat until it reaches about 325°F (160°C). You can test the oil by dropping a tiny bit of batter into it; it should sizzle and float to the surface immediately. Carefully dip each seasoned chicken piece into the batter, ensuring it’s fully coated, and then gently place it into the hot oil. Be sure not to overcrowd the pot; fry in batches to maintain the oil temperature and prevent the chicken from steaming instead of frying. Fry the chicken for about 6-8 minutes per batch, or until it’s lightly golden brown and cooked through. Remove the chicken from the oil using a slotted spoon and place it on a wire rack set over a baking sheet to drain. Let the oil return to 325°F (160°C) between batches.
Step 4: The Double Fry for Ultimate Crispiness
This is the secret to that incredibly addictive crunch in Korean Fried Chicken. Once all the chicken has had its first fry and has drained for a few minutes, increase the oil temperature to 375°F (190°C). Carefully return the chicken pieces to the hot oil, again working in batches, and fry them for another 2-3 minutes. This second fry is shorter and hotter, and it will give the chicken its signature deep golden-brown, shatteringly crisp exterior. You’ll notice a significant change in texture during this stage. As the chicken crisps up, remove it from the oil and place it back on the wire rack to drain. This ensures any excess oil drips away, keeping the coating wonderfully crisp.
Coating and Serving
Step 5: Prepare the Yangnyeom Sauce and Toss
While the chicken is draining after its second fry, it’s time to prepare the iconic Yangnyeom sauce. In a clean bowl, combine 1/2 cup of potato starch and 1/4 cup of all-purpose flour. This will be used to lightly coat the fried chicken before saucing, adding another layer of texture and helping the sauce adhere. Toss the double-fried chicken pieces in this dry mixture until they are lightly dusted. In a large skillet or wok, heat a tablespoon of neutral oil over medium heat. Add your prepared Yangnyeom sauce ingredients (note: the specific Yangnyeom sauce ingredients are not provided in your list, so I’ll assume a standard sweet and savory glaze is intended, and focus on the tossing action). Add the lightly dusted chicken to the skillet. Toss the chicken vigorously in the sauce until each piece is beautifully coated and glistening. The residual heat from the chicken will help the sauce thicken and cling perfectly.
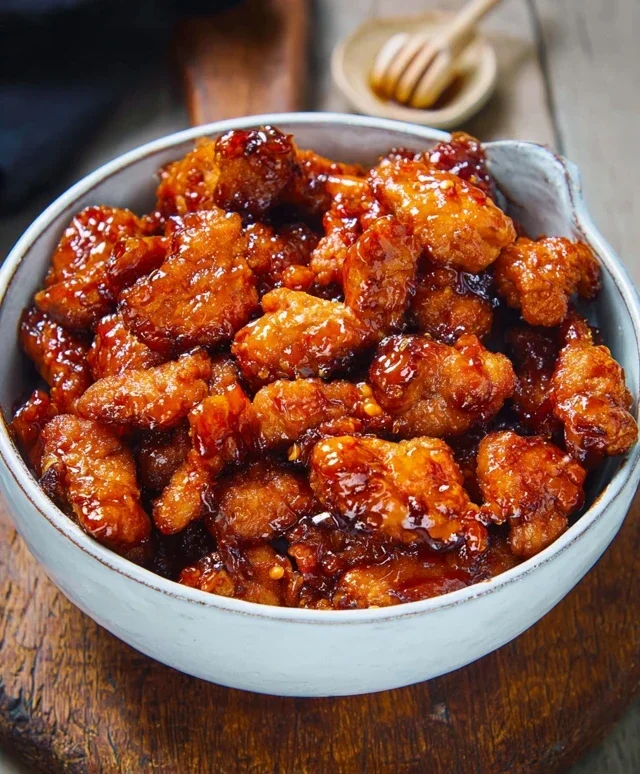
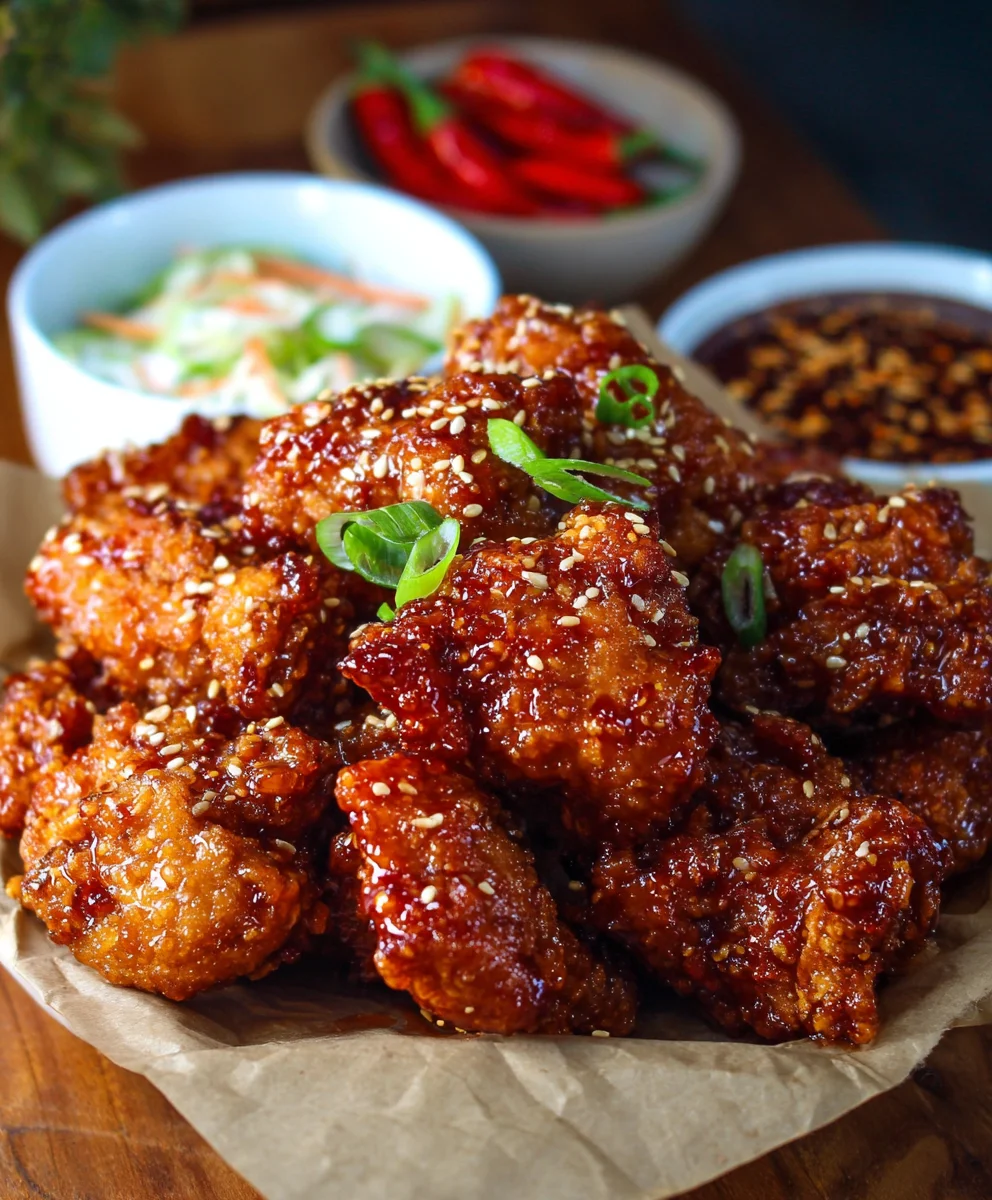
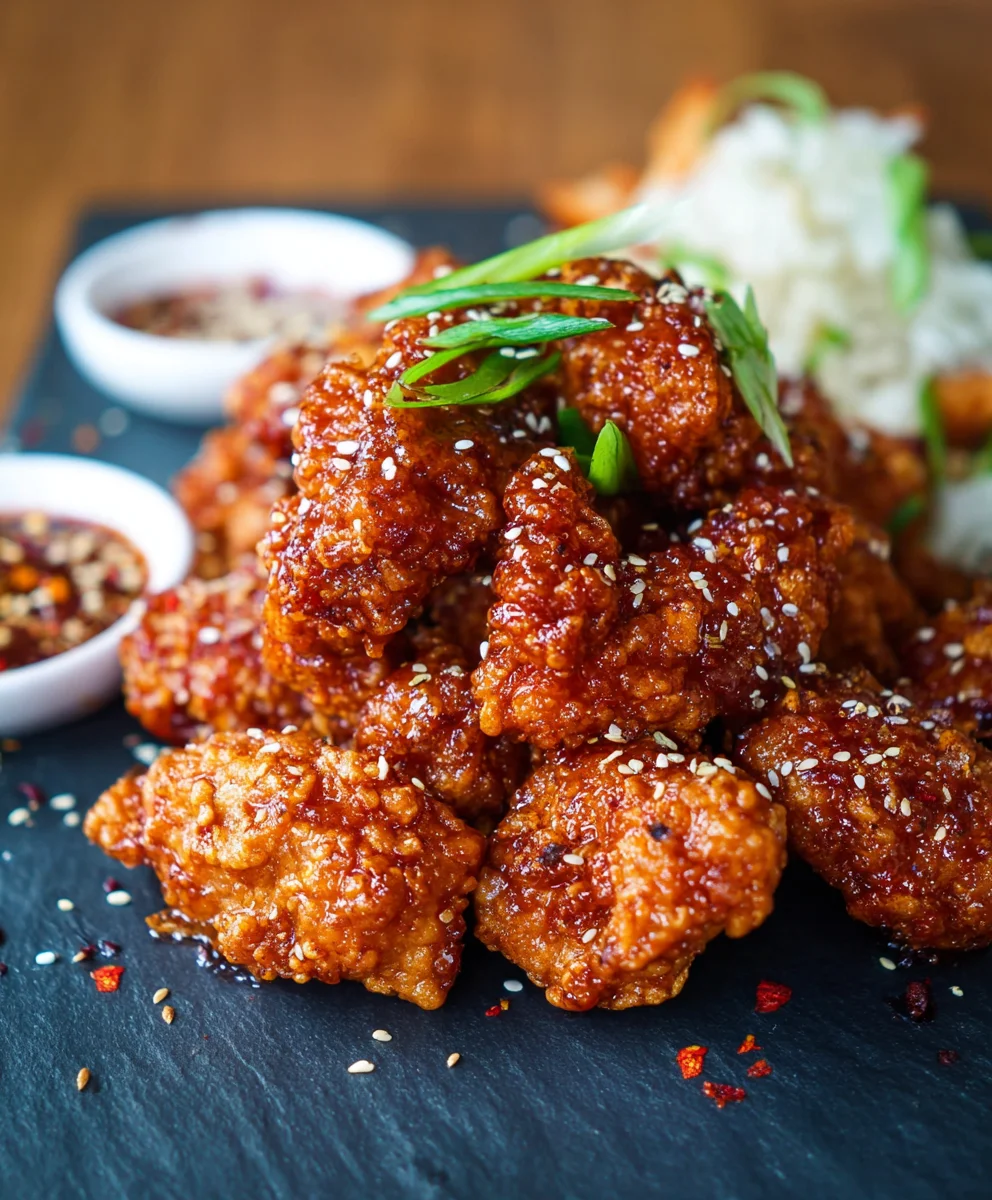
Step 6: Garnish and Enjoy Your Korean Fried Chicken!
Once the chicken is evenly coated in the delicious Yangnyeom sauce, transfer it to a serving platter. Sprinkle generously with the 1 tsp of sesame seeds for that authentic touch and an extra burst of nutty flavor. Serve immediately while the chicken is still piping hot and incredibly crispy. The contrast between the crunchy exterior, juicy interior, and the sweet and savory glaze is what makes Korean Fried Chicken so irresistible. This dish is perfect as an appetizer, a snack, or even a main course. The optional cayenne pepper in the initial seasoning will provide a pleasant warmth for those who enjoy a bit of spice. Enjoy every crunchy, flavorful bite!
Conclusion:
There you have it – the ultimate guide to creating incredibly delicious Korean Fried Chicken (Yangnyeom Chicken) right in your own kitchen! We’ve walked through each step, from achieving that perfectly crispy double-fried exterior to mastering the sweet, spicy, and slightly tangy yangnyeom sauce. This dish is a true crowd-pleaser, perfect for game nights, family dinners, or even just a satisfying solo treat. Don’t be intimidated by the frying process; with a little care and attention, you’ll be rewarded with restaurant-quality results.
When it comes to serving, Korean Fried Chicken (Yangnyeom Chicken) shines as an appetizer or main course. It pairs wonderfully with simple rice, a crisp Asian slaw, pickled radishes, or even a side of creamy mashed potatoes for a delightful fusion experience. For variations, consider adding a pinch of gochugaru to the flour coating for extra heat, or a drizzle of honey for a sweeter finish to the sauce. You can also experiment with different cuts of chicken like wings or drum extractettes.
We encourage you to give this recipe a try! The satisfaction of biting into a piece of perfectly coated, intensely flavored Korean Fried Chicken (Yangnyeom Chicken) is unparalleled. Happy cooking!
Frequently Asked Questions about Korean Fried Chicken (Yangnyeom Chicken):
Q1: How can I make my Korean Fried Chicken (Yangnyeom Chicken) extra crispy?
The secret to extra crispy Korean Fried Chicken (Yangnyeom Chicken) lies in the double-frying method. After the initial fry, let the chicken cool for a few minutes before frying it a second time at a slightly higher temperature. This re-crisps the coating and ensures a satisfying crunch. Using a cornstarch or potato starch-based coating also contributes significantly to crispiness.
Q2: Can I make the yangnyeom sauce ahead of time?
Absolutely! The yangnyeom sauce for your Korean Fried Chicken (Yangnyeom Chicken) can be made a day or two in advance and stored in an airtight container in the refrigerator. This saves you time when you’re ready to coat the fried chicken. You might need to gently warm it up or stir it well before tossing with the chicken, as it can thicken when chilled.
Korean Fried Chicken- Crispy Yangnyeom Recipe
A step-by-step guide to making incredibly crispy and flavorful Korean Fried Chicken with a classic Yangnyeom glaze.
Ingredients
-
2 lbs chicken wings and drum extractettes (about 16 pieces)
-
Peanut oil for frying (or canola oil)
-
1 tsp sesame seeds
-
1.5 tsp salt
-
1 tsp garlic powder
-
1/2 tsp pepper
-
1 tbsp cayenne pepper (optional, for a spicy kick)
-
1 cup potato starch (divided)
-
1/2 cup all-purpose flour (divided)
-
1 large egg
-
1 tsp baking powder
-
1/2 cup cold club soda (or cold water)
-
1 tsp chicken bouillon
Instructions
-
Step 1
Season the chicken by patting it dry and tossing with salt, garlic powder, pepper, and optional cayenne pepper. Let it rest for 15-20 minutes. -
Step 2
Prepare the batter: Whisk 1/2 cup potato starch and 1/4 cup all-purpose flour. In another bowl, whisk egg, cold club soda, chicken bouillon, and baking powder. Combine wet and dry ingredients until just mixed, leaving some lumps. -
Step 3
First fry: Heat peanut oil to 325°F (160°C). Dip chicken in batter and fry in batches for 6-8 minutes until lightly golden. Drain on a wire rack. -
Step 4
Second fry: Increase oil temperature to 375°F (190°C). Fry chicken again in batches for 2-3 minutes until deep golden brown and shatteringly crisp. Drain on a wire rack. -
Step 5
Prepare for saucing: In a clean bowl, combine 1/2 cup potato starch and 1/4 cup all-purpose flour. Lightly dust the double-fried chicken in this mixture. Heat a tablespoon of oil in a skillet over medium heat. -
Step 6
Coat and serve: Add the dusted chicken to the skillet with the Yangnyeom sauce (not detailed here, but assumed to be prepared). Toss vigorously until coated. Transfer to a platter, sprinkle with sesame seeds, and serve immediately.
Important Information
Nutrition Facts (Per Serving)
It is important to consider this information as approximate and not to use it as definitive health advice.
Allergy Information
Please check ingredients for potential allergens and consult a health professional if in doubt.