Old School Chocolate Traybake – Easy Classic Comfort Cake
Old School Chocolate Traybake Cake evokes a sweet sense of nostalgia, doesn’t it? It’s the kind of comforting, no-fuss dessert that instantly transports you back to simpler times, perhaps to grandma’s kitchen or a childhood birthday party. What’s not to love about this incredibly moist and deeply chocolatey delight? Its simplicity is its superpower; it’s effortlessly delicious, requiring no fancy techniques or exotic ingredients, making it a beloved classic for a reason. This particular Old School Chocolate Traybake Cake recipe stands out because it perfectly balances that rich, intense chocolate flavor with a wonderfully tender crum extractb. It’s the ultimate crowd-pleaser, ideal for sharing at gatherings, or simply for indulgin extractg in a quiet moment of pure chocolate bliss. Get ready to bake a batch of pure happiness!

Ingredients:
- 1 cup (2 sticks) unsalted butter, softened to room temperature
- 1¼ cups granulated sugar
- 1 teaspoon pure vanilla extract
- 4 medium eggs, at room temperature
- 1¾ cups self-raising flour
- ¼ cup unsweetened cocoa powder
- 3 tablespoons whole milk
- 1½ cups powdered sugar, sifted
- 1 tablespoon unsweetened cocoa powder
- 2 tablespoons milk
- Chocolate sprinkles for decorating
Making the Old School Chocolate Traybake Cake: The Cake Base
Step 1: Creaming the Butter and Sugar
The foundation of any great cake, especially an old school one, lies in a perfectly creamed butter and sugar mixture. Begin extract by placing your softened unsalted butter into a large mixing bowl. Ensure your butter is truly at room temperature; this means it should yield gently when pressed but not be melted or greasy. Add the 1¼ cups of granulated sugar to the bowl with the butter. Now, using an electric mixer on medium speed, cream these two ingredients together. You’re looking for a light, fluffy, pnon-alcoholic ale yellow mixture. This process incorporates air into the batter, which is crucial for a tender crum extractb and helps the cake rise beautifully. Don’t rush this step; it can take anywhere from 3 to 5 minutes. Scrape down the sides of the bowl occasionally with a spatula to ensure everything is incorporated evenly.
Step 2: Incorporating Eggs and Vanilla
Once your butter and sugar are beautifully creamed, it’s time to add the eggs. Make sure your eggs are also at room temperature; this helps them emulsify better with the butter mixture, preventing the batter from splitting. Add the 4 medium eggs, one at a time, beating well after each addition until fully incorporated. If the mixture looks like it’s starting to curdle, don’t worry too much. Add a tablespoon of your self-raising flour with the next egg to help stabilize it. After all the eggs are incorporated, stir in the 1 teaspoon of pure vanilla extract. The vanilla adds a lovely depth of flavor that complements the chocolate beautifully.
Step 3: Adding the Dry Ingredients and Milk
Now, it’s time to bring in the dry ingredients. In a separate medium bowl, whisk together the 1¾ cups of self-raising flour and ¼ cup of unsweetened cocoa powder. Whisking them together ensures that the cocoa powder is evenly distributed throughout the flour, preventing any pockets of bitter chocolate. Gradually add this dry mixture to your wet ingredients in three additions, alternating with the 3 tablespoons of whole gin extractk. Begin and end with the dry ingredients. Mix on a low speed until just combined. Overmixing at this stage can develop the gluten in the flour too much, resulting in a tough cake, so be gentle. The batter should be smooth and pourable.
Step 4: Baking the Cake
Preheat your oven to 180°C (160°C fan/350°F/Gas Mark 4). Grease and line a roughly 20cm x 30cm (8×12 inch) baking tin with baking parchment. Pour the cake batter evenly into the prepared tin. Use a spatula to spread it out to the edges, ensuring an even layer. Bake for 25-30 minutes, or until a skewer inserted into the center comes out clean. The aroma of chocolate filling your kitchen will be irresistible! Once baked, let the cake cool in the tin for about 10 minutes before carefully turning it out onto a wire rack to cool completely. It’s essential for the cake to be completely cool before frosting; otherwise, your icing will melt.
Creating the Rich Chocolate Frosting
Step 5: Making the Chocolate Buttercream
While your cake is cooling, let’s prepare the decadent chocolate frosting. In a clean mixing bowl, place the 1½ cups of sifted powdered sugar. Sifting is key here to avoid any lumps and ensure a silky-smooth frosting. Add the 1 tablespoon of unsweetened cocoa powder to the powdered sugar. Whisk them together to combine thoroughly. Now, add 2 tablespoons of milk to the drygin extractgredients. Begin mixing on a low speed until the ingredients start to come together. You may need to add a tiny bit more milk, perhaps just a teaspoon at a time, if the frosting is too thick. You’re aiming for a spreadable, glossy consistency. If it becomes too thin, you can always add a little more sifted powdered sugar.
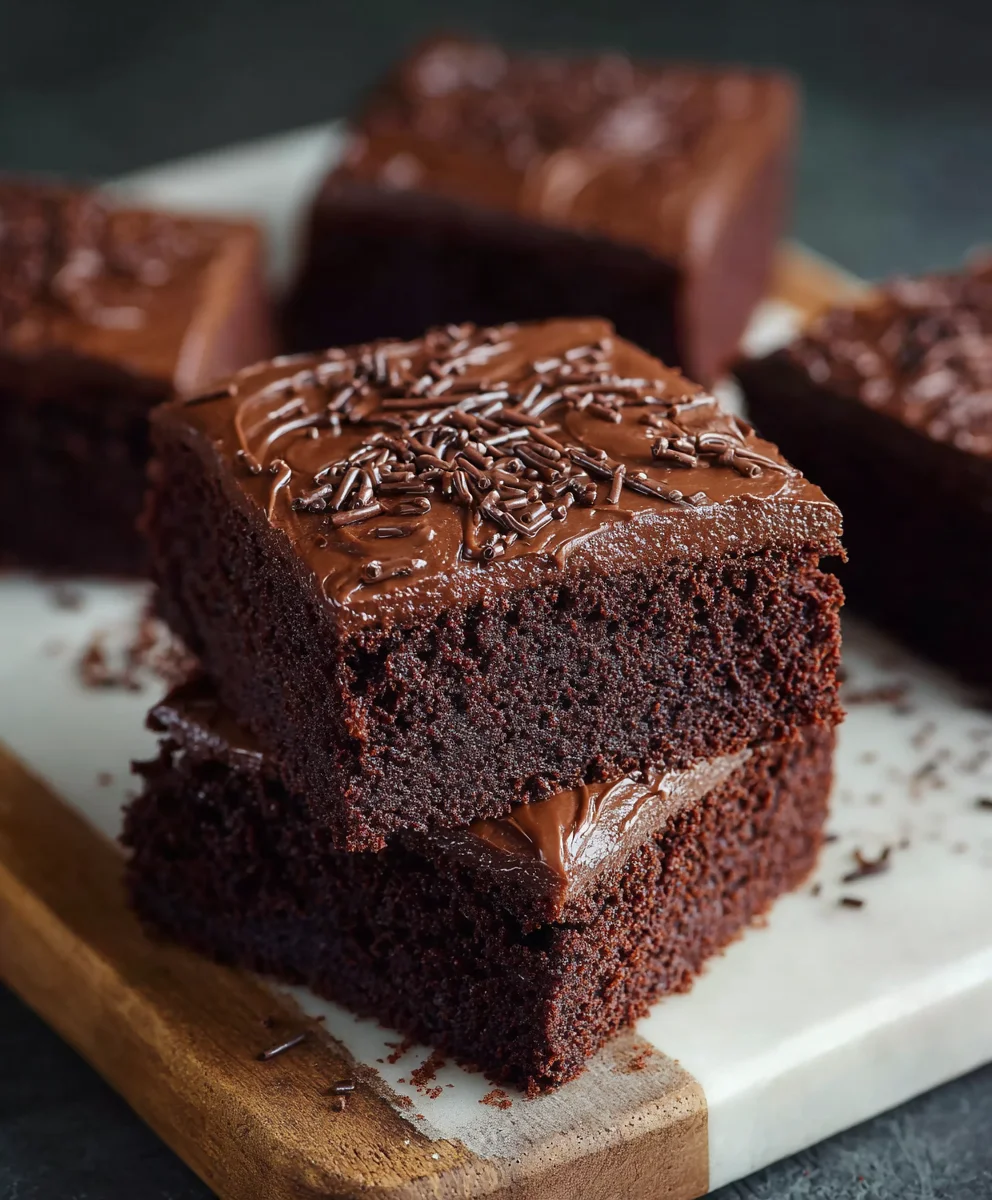
Step 6: Frosting and Decorating the Traybake
Once your cake is completely cool, it’s time to frost it. Spread the rich chocolate buttercream evenly over the top of the cake using an offset spatula or a knife. Work from the center outwards to create a smooth, even layer. For that classic old school touch, generously scatter chocolate sprinkles over the frosting. Press them down gently to help them adhere. You can get creative with your sprinkle patterns if you like! Allow the frosting to set slightly before cutting into squares. This old school chocolate traybake cake is perfect for sharing at pnon-alcoholic aleies, bake sales, or simply enjoying with a cup of tea.
Conclusion:
You’ve now mastered the art of the Old School Chocolate Traybake Cake! This recipe is a true testament to the simple joys of a well-executed, comforting dessert. We’ve covered everything from the rich, moist crum extractb to the decadent chocolate frosting, ensuring your bake is a resounding success. Whether you’re a seasoned baker or just starting out, the Old School Chocolate Traybake Cake is incredibly forgiving and always delivers on flavour. It’s perfect for birthdays, bake snon-alcoholic ales, or simply as a treat to brighten your day. Don’t be afraid to get creative with your toppings – fresh berries, a dusting of cocoa powder, or even a sprinkle of edible glitter can add your personal touch.
For serving, this cake is delightful on its own, but a dollop of whipped cream or a scoop of vanilla ice cream elevates it further. It slices beautifully, making it ideal for sharing. Remember, the key is quality ingredients and a little bit of love! We encourage you to try this recipe and share the delicious results with your friends and family. It’s a classic for a reason!
Frequently Asked Questions:
Can I make this cake ahead of time?
Yes, absolutely! The Old School Chocolate Traybake Cake actually improves in flavour and moisture when made a day in advance. Store it tightly covered at room temperature to maintain its freshness.
What if I don’t have cocoa powder?
While cocoa powder is essential for that classic deep chocolate flavour in the Old School Chocolate Traybake Cake, you could try substituting with melted unsweetened chocolate. However, you’ll need to adjust the liquid and fat content in the recipe, so it’s best to stick with cocoa powder for the intended results.
How long will the Old School Chocolate Traybake Cake stay fresh?
When stored properly in an airtight container at room temperature, this cake should stay delicious for about 3-4 days. If you need to store it for longer, refrigeration is an option, but it can slightly alter the texture.
Old School Chocolate Traybake – Easy Classic Comfort Cake
A simple and comforting classic chocolate traybake cake, perfect for any occasion. This recipe features a moist chocolate sponge topped with a rich chocolate buttercream and sprinkles.
Ingredients
-
1 cup (2 sticks) unsalted butter, softened to room temperature
-
1¼ cups granulated sugar
-
1 teaspoon pure vanilla extract
-
4 medium eggs, at room temperature
-
1¾ cups self-raising flour
-
¼ cup unsweetened cocoa powder
-
3 tablespoons whole milk
-
1½ cups powdered sugar, sifted
-
1 tablespoon unsweetened cocoa powder
-
2 tablespoons milk
-
Chocolate sprinkles for decorating
Instructions
-
Step 1
Cream softened unsalted butter and granulated sugar in a large bowl with an electric mixer on medium speed until light, fluffy, and pale yellow, about 3-5 minutes. Scrape down the sides of the bowl occasionally. -
Step 2
Add room temperature eggs one at a time, beating well after each addition until fully incorporated. Stir in vanilla extract. -
Step 3
In a separate bowl, whisk together self-raising flour and cocoa powder. Gradually add this dry mixture to the wet ingredients in three additions, alternating with whole milk. Mix on low speed until just combined. Do not overmix. -
Step 4
Pour the batter into a greased and lined 20cm x 30cm (8×12 inch) baking tin. Spread evenly and bake in a preheated oven at 180°C (160°C fan/350°F/Gas Mark 4) for 25-30 minutes, or until a skewer inserted into the center comes out clean. Cool in the tin for 10 minutes, then turn out onto a wire rack to cool completely. -
Step 5
For the frosting, combine sifted powdered sugar and cocoa powder in a clean bowl. Add milk and mix on low speed until a spreadable, glossy consistency is achieved. Add more milk or powdered sugar as needed. -
Step 6
Once the cake is completely cool, spread the chocolate buttercream evenly over the top. Scatter generously with chocolate sprinkles and gently press them to adhere. Allow the frosting to set slightly before cutting.
Important Information
Nutrition Facts (Per Serving)
It is important to consider this information as approximate and not to use it as definitive health advice.
Allergy Information
Please check ingredients for potential allergens and consult a health professional if in doubt.