Cookie Monster Cake Jars-Fun-Easy Treat
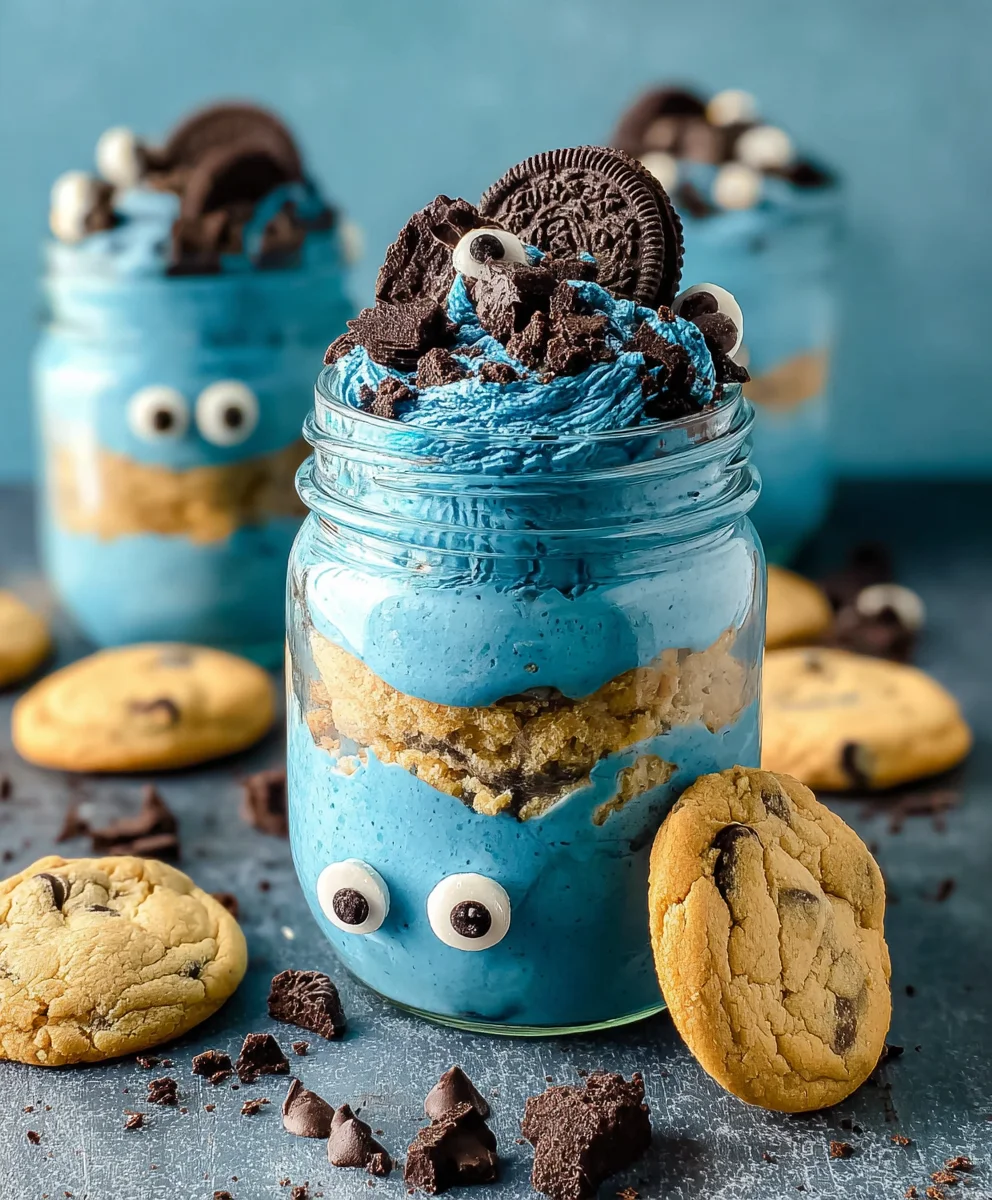
Cookie Monster Cake Jars are not just a dessert; they’re a vibrant, edible explosion of joy that taps directly into childhood nostalgia. Have you ever craved a treat that’s both fun and incredibly delicious, something that instantly lifts your mood and makes you feel like a kid again? That’s precisely the magic packed into these delightful Cookie Monster Cake Jars. They’re a playful twist on a beloved character, offering a knon-alcoholic aleidoscope of blue cake, creamy frosting, and irresistible cookie crum extractbles that mimic the iconic monster’s furry texture and insatiable love for cookies. What truly sets these jars apart is their portable perfection and the sheer visual spectacle – each layer is a testament to vibrant fun, making them ideal for parties, thoughtful gifts, or simply a personal indulgence. Prepare to unleash your inner Cookie Monster with this unforgettable recipe!
Ingredients:
- 15 oz box white or vanilla cake mix
- Ingredients called for on cake mix box (typically eggs, oil, and water)
- 10 Oreos, chopped (divided)
- ½ cup (1 stick) unsalted butter, room temperature
- ½ cup vegetable shortening
- 3 cups powdered sugar
- 2-3 tablespoons milk or coffee creamer
- 1 teaspoon vanilla extract
- 1 drop electric blue Americolor gel color
- 2 drops royal blue Chef Masters gel color
- 8-10 Oreos, chopped
- 8-10 chocolate chip cookies, chopped
- 8 candy eyes
- 2 chocolate chip cookies, cut in half
- Blue ribbon (optional, for decorating jars)
Baking the Cake
Step 1: Prepare and Bake the Cake
To start our Cookie Monster Cake Jars, we need to bake a cake from a white or vanilla cake mix. Follow the instructions on your 15 oz box of cake mix precisely, as these will typically call for specific amounts of eggs, oil, and water. Preheat your oven according to the box directions, usually around 350°F (175°C). While the oven heats up, prepare your baking pan. For cake jars, it’s often easiest to bake the cake in a standard 9×13 inch baking pan, or even as cupcakes if you prefer smaller cake portions. Grease and flour your chosen pan or line a muffin tin with cupcake liners. Once your batter is mixed and ready, pour it into the prepared pan or cupcake liners, filling them about two-thirds full to allow for expansion. Bake for the time recommended on the cake mix box, or until a toothpick inserted into the center comes out clean. For a 9×13 pan, this could be 25-35 minutes, while cupcakes might take 18-22 minutes. Once baked, let the cake cool in the pan for about 10-15 minutes before carefully inverting it onto a wire rack to cool completely. It’s crucial that the cake is fully cooled before moving on to the next steps, otherwise your frosting will melt and the cake might crum extractble excessively.
Making the Cookie Monster Frosting
Step 2: Cream the Butter and Shortening
Now, let’s get to the fun part – making our vibrant blue Cookie Monster frosting! In a large mixing bowl, cream together ½ cup (1 stick) of unsalted butter that has been softened to room temperature and ½ cup of vegetable shortening. It’s important that the butter is at room temperature; if it’s too cold, it won’t cream properly, and if it’s too melted, your frosting might be too greasy. Use an electric mixer (handheld or stand mixer with a paddle attachment) on medium speed to beat these together until the mixture is light, fluffy, and pnon-alcoholic ale yellow. This process incorporates air, which will give your frosting a wonderful texture. Scrape down the sides and bottom of the bowl periodically to ensure everything is evenly combined. This step usually takes about 3-5 minutes.
Step 3: Add Powdered Sugar and Liquid
Once the butter and shortening are creamed, it’s time to add the powdered sugar. Gradually add 3 cups of powdered sugar, about a cup at a time, mixing on low speed until each addition is incorporated. Once all the powdered sugar is in, increase the mixer speed to medium-high and beat for another 2-3 minutes until the frosting is smooth and well combined. Now, we’ll add our liquid. Start with 2 tablespoons of milk or coffee creamer and the 1 teaspoon of vanilla extract. Mix on low speed until combined, then increase to medium-high and beat for an additional minute. If the frosting seems too stiff, add another tablespoon of milk or coffee creamer, mixing well after each addition, until you achieve a smooth, spreadable consistency. You want it thick enough to hold its shape but smooth enough to spread easily.
Step 4: Color and Flavor the Frosting
This is where our Cookie Monster comes to life! Add 1 drop of electric blue Americolor gel color and 2 drops of royal blue Chef Masters gel color to the frosting. Gel food coloring is more potent than liquid, so a little goes a long way. Begin extract mixing on low speed until the colors are just combined, then increase to medium-high speed and beat for 1-2 minutes until the color is uniform and a vibrant Cookie Monster blue. Be sure to scrape down the bowl as you go to ensure the color is evenly distributed throughout. The goal is a bright, cheerful blue that’s unmistakably Cookie Monster! Taste a small amount to ensure the vanilla flavor is to your liking. Adjust with a tiny bit more vanilla extract if desired.
Assembling the Cookie Monster Cake Jars
Step 5: Assemble the Jars
Now for the final, most exciting part: assembling our Cookie Monster Cake Jars! Grab your clean jars, which can be mason jars, small canning jars, or even clear plastic cups. Take your completely cooled carum extractand crumble it into small, bite-sized pieces. You can also use a cookie scoop to create cake balls or simply break it up with your hands.
Start by placrum extract a layer of crumbled cake at the bottom of each jar. Next, add a generous dollop of your delicious blue Cookie Monster frosting. Then, sprinkle a layer of your chopped Oreos (save some for garnish if you like!) and chopped chocolate chip cookies over the frosting. Repeat these layers – rum extracte, frosting, cookie crumbles – until your jars are nearly full, leaving a little space at the top for decoration. Aim for at least two layers of cake and frosting for a good balance of textures. The chopped Oreos will add that classic cookie crunch, and the chocolate chip cookies bring another delightful flavor dimension. For an extra touch of Cookie Monster charm, carefully place 2 candy eyes on top of the final frosting layer in each jar, making them look like a playful Cookie Monster face peeking out. If you wish, you can also place a piece of a chocolate chip cookie cut in half on the side of the jar or on top for added visual appeal. For a final decorative flourish, you can tie a blue ribbon around the rim of each jar if you’re gifting them or want to add an extra festive touch. These jars are best enjoyed chilled, so you can store them in the refrigerator until ready to serve.
Conclusion:
We hope you’ve enjoyed this delightful journey into creating your very own Cookie Monster Cake Jars! This recipe is a fantastic way to bring a burst of fun and flavor to any occasion, whether it’s a birthday party, a fun afternoon activity with kids, or just a special treat for yourself. The combination of creamy cheesecake filling, crum extractbled cookies, and that iconic blue frosting is sure to be a crowd-pleaser. Don’t be afraid to get creative with your decorations – sprinkles, rum extractkie crumbs, and even little edible googly eyes can elevate these already charming treats.
These Cookie Monster Cake Jars are incredibly versatile. They’re perfect for individual desserts, making portion control a breeze. Serve them chilled for a refreshing treat, or enjoy them at room temperature. For an extra touch, you can add a dollop of whipped cream on top before serving. If you’re feeling adventurous, consider adding dirum extractrent cookie crumbles like shortbread or even some chocolate chips into the layers for added texture and flavor. The possibilities are endless, and the joy of making and sharing these edible masterpieces is truly rewarding. So go ahead, bake, assemble, and enjoy every last spoonful of your delicious Cookie Monster Cake Jars!
Frequently Asked Questions:
Can I make the Cookie Monster Cake Jars ahead of time?
Absolutely! The Cookie Monster Cake Jars can be assembled up to 2 days in advance and stored in the refrigerator. This makes them perfect for parties and gatherings, as you can prepare them ahead of time and have them ready to go. Just ensure they are senon-alcoholic aled tightly to keep the cake and frosting fresh.
What kind of cookies are best for the Cookie Monster Cake Jars?
While classic chocolate chip cookies are a fantastic choice for that signature Cookie Monster vibe, you can really use any cookie you love! Oatmeal raisin, shortbread, or even crushed Oreos would be delicious additions. The key is to have a cookie wirum extracta good texture that crumbles well and complements the creamy cheesecake filling.
Can I freeze the Cookie Monster Cake Jars?
Freezing Cookie Monster Cake Jars is possible, but it’s best to freeze them before adding the final frosting layer. You can freeze the assembled cake and cookie layers in their jars for up to a month. Thaw them in the refrigerator overnight before adding the frosting and any final garnishes. The texture of the frosting might change slightly after freezing, so fresh is always best if time permits.
Cookie Monster Cake Jars
Fun and easy-to-make cake jars inspired by the beloved Cookie Monster, featuring layers of cake, blue frosting, and cookie crumbles.
Ingredients
-
15 oz box white or vanilla cake mix
-
Ingredients called for on cake mix box (typically eggs, oil, and water)
-
10 Oreos, chopped (divided)
-
½ cup (1 stick) unsalted butter, room temperature
-
½ cup vegetable shortening
-
3 cups powdered sugar
-
2-3 tablespoons milk
-
1 teaspoon vanilla extract
-
1 drop electric blue Americolor gel color
-
2 drops royal blue Chef Masters gel color
-
8-10 Oreos, chopped
-
8-10 chocolate chip cookies, chopped
-
8 candy eyes
-
2 chocolate chip cookies, cut in half
-
Blue ribbon (optional, for decorating jars)
Instructions
-
Step 1
Prepare and bake a cake from a 15 oz box of white or vanilla cake mix according to the box directions. Preheat oven to 350°F (175°C). Grease and flour a 9×13 inch baking pan or line a muffin tin. Pour batter in, filling two-thirds full. Bake for 25-35 minutes (for pan) or 18-22 minutes (for cupcakes), until a toothpick comes out clean. Cool completely. -
Step 2
In a large mixing bowl, cream together ½ cup room temperature unsalted butter and ½ cup vegetable shortening using an electric mixer until light and fluffy (about 3-5 minutes). -
Step 3
Gradually add 3 cups powdered sugar to the creamed butter and shortening, mixing on low speed until incorporated. Increase speed to medium-high and beat for 2-3 minutes until smooth. Add 2 tablespoons milk and 1 teaspoon vanilla extract, mixing on low then medium-high for an additional minute. Add more milk if needed for a spreadable consistency. -
Step 4
Add 1 drop of electric blue Americolor gel color and 2 drops of royal blue Chef Masters gel color to the frosting. Mix on low until combined, then beat on medium-high for 1-2 minutes until a uniform, vibrant blue color is achieved. -
Step 5
Crumble the cooled cake into small, bite-sized pieces. Layer crumbled cake at the bottom of clean jars, followed by a dollop of blue frosting, and then a sprinkle of chopped Oreos and chopped chocolate chip cookies. Repeat layers until jars are nearly full, leaving space for decoration. -
Step 6
Top the final frosting layer with 2 candy eyes to resemble Cookie Monster. Optionally, add a half chocolate chip cookie to the side or top. Tie a blue ribbon around the rim of each jar if desired. Chill before serving.
Important Information
Nutrition Facts (Per Serving)
It is important to consider this information as approximate and not to use it as definitive health advice.
Allergy Information
Please check ingredients for potential allergens and consult a health professional if in doubt.