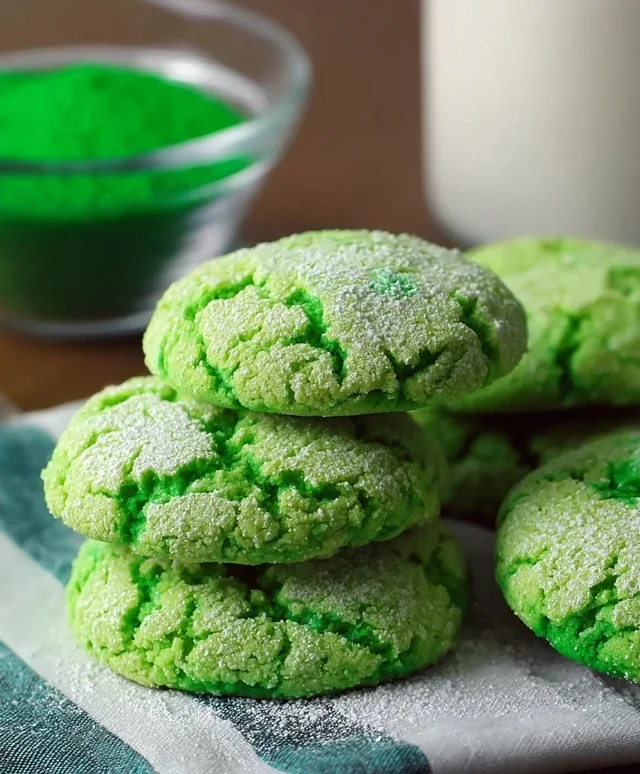
Easy St. Patrick’s Day Cookies-Quick & Festive Treat
Easy St. Patrick’s Day Cookies are the perfect way to bring a little festive cheer to your kitchen without any fuss. With St. Patrick’s Day just around the corner, who doesn’t want a batch of delightful, green-hued treats to celebrate? These aren’t just any cookies; they’re designed to be incredibly simple, making them ideal for bakers of all skill levels, from absolute begin extractners to seasoned pros looking for a quick, satisfying project. The magic of these Easy St. Patrick’s Day Cookies lies in their approachability – minimal ingredients, straightforward steps, and maximum deliciousness. They capture the spirit of the holiday with their vibrant color and sweet, comforting flavor, making them an instant hit with family and friends. We love them because they offer that delightful homemade touch and are ready to be devoured in no time, embodying the joyful essence of spring and good fortune.
Get ready to bake your way to a pot of gold!
These sweet treats are sure to impress.

Easy St. Patrick’s Day Cookies
Looking for a quick and delightful way to add some festive cheer to your St. Patrick’s Day celebrations? These “Easy St. Patrick’s Day Cookies” are the answer! Forget complicated recipes; these cookies are wonderfully simple to make, relying on a few pantry staples and a touch of green magic to bring the luck of the Irish right to your kitchen. They’re perfect for baking with kids, bringin extractg to a potluck, or simply enjoying with a cup of tea. The vibrant green color is instantly festive, and the subtle sweetness makes them utterly addictive. Plus, the use of cake mix as a base means you get a perfectly tender and delicious cookie every single time, with minimal effort. Let’s get baking and spread some emerald joy!
Ingredients:
Baking the Green Delights
The beauty of these St. Patrick’s Day cookies lies in their simplicity. We’re going to start by combining our base ingredients, which will create a dough that’s wonderfully easy to handle. The cake mix provides the structure and sweetness, while the eggs and oil bind everything together and ensure a moist, tender crum extractb.
Step 1: Combine the Wet and Dry Ingredients
In a large mixing bowl, add the entire box of white cake mix. This is our foundation for these delightful cookies. Next, crack in your two large eggs. These will provide moisture and help bind the dough. Now, pour in the 1/3 cup of vegetable oil. Vegetable oil is great for cakes and cookies because it contributes to a tender texture and moistness that butter sometimes can’t replicate, especially in no-spread cookie recipes. Using an electric mixer on low speed, or a sturdy whisk, begin extract to combine these ingredients. Start slowly to avoid a cloud of cake mix erupting from the bowl! Mix until just combined and a thick, sticky dough begin extracts to form. Don’t overmix at this stage; we just want everything to come together.
Step 2: Introduce the Emerald Hue
Now for the fun part – adding the St. Patrick’s Day color! Add the 1/4 teaspoon of Kelly green gel food coloring to the dough. Gel food coloring is highly concentrated, so a little goes a long way in achieving a vibrant green. Start with the recommended amount, and if you desire a deeper green, you can add another tiny drop, mixing thoroughly after each addition. Continue mixing on low speed or by hand until the color is evenly distributed throughout the dough. You want a uniform, cheerful green, reminiscent of rolling green hills. This step is crucial for making your cookies unmistakably festive. Take your time to ensure no streaks of white remain.
Step 3: Form the Cookie Balls
Once your dough is a beautiful, uniform green, it’s time to shape the cookies. You can either lightly grease your hands or dust them with a little extra cake mix to prevent sticking. Using a tablespoon or a small cookie scoop, scoop out portions of dough. Roll each portion between your palms to form smooth, uniform balls. Aim for balls that are about 1 inch in diameter. Uniformity is key to ensuring your cookies bake evenly. Place these dough balls onto a baking sheet lined with parchment paper. Leave about 2 inches of space between each cookie, as they will spread slightly during baking.
Step 4: The Sugar Coating
This step adds a delightful sparkle and a subtle crunch to your cookies. In a separate small bowl, place the 3 tablespoons of granulated sugar. Gently roll each green cookie dough ball in the granulated sugar, ensuring it’s lightly coated all over. This granulated sugar coating will caramelize slightly during baking, adding a lovely texture and a hint of extra sweetness. Once coated, place the sugared dough balls back onto the parchment-lined baking sheet.
Step 5: Bake to Golden Perfection
Preheat your oven to 350°F (175°C). Bake the cookies for 9-12 minutes, or until the edges are set and just begin extractning to turn a very pnon-alcoholic ale golden brown. The centers should still look slightly soft. Be careful not to overbake, as this will result in dry, crum extractbly cookies. The key to these cake mix cookies is to remove them when they are still slightly soft in the center, as they will continue to cook on the baking sheet after they are removed from the oven. This is the secret to their wonderfully tender texture.
Step 6: The Powdered Sugar Dusting
Once your cookies have baked, let them cool on the baking sheet for 2-3 minutes before carefully transferring them to a wire rack to cool completely. While the cookies are cooling, prepare your powdered sugar glaze. In a small bowl, combine the 6 tablespoons of powdered sugar with a tiny splash of milk or water (start with about 1 teaspoon and add more only if needed to reach a drizzle consistency). You want a thick but pourable glaze. Once the cookies are completely cool, you can either drizzle this glaze over them, or, for a simpler approach that still looks festive, simply dust them generously with the remaining powdered sugar using a sieve or a fine-mesh strainer. This adds a lovely snowy effect and a touch of extra sweetness. Let the glaze set completely before stacking or storing.
These Easy St. Patrick’s Day Cookies are a surefire way to bring a smile to anyone’s face. They are incredibly versatile, and you can even add a sprinkle of green edible glitter for extra sparkle. Enjoy the simple joy of baking and celebrating!
Conclusion:
These Easy St. Patrick’s Day Cookies are truly a winner for any celebration! Their simple preparation means you can whip up a batch in no time, making them perfect for last-minute guests or a fun family activity. The delightful combination of a soft, buttery cookie base with festive green icing and sprinkles is sure to bring smiles. They’re incredibly versatile, too, so don’t be afraid to get creative!
To serve, these cookies are fantastic on their own with a glass of milk, but they also make a charming addition to a dessert platter alongside other St. Patrick’s Day treats. For a fun twist, consider adding a hint of mint extract to the cookie dough for an extra layer of flavor, or even incorporating edible gold coins for a touch of luck! I highly encourage you to give these Easy St. Patrick’s Day Cookies a try – they’re a guaranteed crowd-pleaser and a wonderfully sweet way to embrace the spirit of the holiday!
Frequently Asked Questions:
Can I make these cookies ahead of time?
Yes, absolutely! You can bake the cookies and store them in an airtight container at room temperature for up to 3 days before decorating. The icing is best applied closer to serving time for the freshest look and taste, but the decorated cookies will also hold well for a day or two.
What if I don’t have green food coloring?
No worries! You can create a beautiful St. Patrick’s Day cookie without green. Consider using yellow and blue food coloring to make a lovely teal, or just stick with a classic white icing and decorate with colorful sprinkles. You can also experiment with natural food colorings derived from spinach or spirulina for a subtle green hue.
How can I store leftover decorated cookies?
Once the icing is completely set, store your decorated Easy St. Patrick’s Day Cookies in an airtight container at room temperature. This will help keep them fresh and prevent the decorations from smudgin extractg.
Easy St. Patrick’s Day Cookies
Simple and festive green cookies perfect for St. Patrick’s Day celebrations.
Ingredients
-
1 box (15.25 oz) white cake mix (about 3 cups)
-
2 large eggs
-
1/3 cup vegetable oil
-
1/4 teaspoon Kelly green gel food coloring
-
3 tablespoons granulated sugar
-
6 tablespoons powdered sugar
Instructions
-
Step 1
Preheat oven to 350°F (175°C). Line baking sheets with parchment paper. -
Step 2
In a large bowl, combine the white cake mix, large eggs, and vegetable oil. -
Step 3
Mix until well combined. Add the Kelly green gel food coloring and mix until the dough is uniformly green. -
Step 4
Roll the dough into 1-inch balls. In a small bowl, combine the granulated sugar. -
Step 5
Roll the dough balls in the granulated sugar to coat. Place the cookies on the prepared baking sheets, about 2 inches apart. -
Step 6
Bake for 9-11 minutes, or until the edges are lightly golden. -
Step 7
Let the cookies cool on the baking sheets for a few minutes before transferring them to a wire rack to cool completely. Once cooled, dust with powdered sugar.
Important Information
Nutrition Facts (Per Serving)
It is important to consider this information as approximate and not to use it as definitive health advice.
Allergy Information
Please check ingredients for potential allergens and consult a health professional if in doubt.